- Share your priorities – make them aware of what your strategic priorities are at the time and if they can help they will. If they can’t help, then let them know what the bigger picture is and maybe they can help down the road.
- Let them help you build your internal business case – it’s very common in elearning that the learning and development team will have to “sell” the idea internally in order to get approval for projects so let the vendor help you! It’s only in their best interests.
- Act as collaborative partners – once you’ve reached a deal and have that contract signed, work as a team to achieve long-term goals and expectations. This will only pay-off in the long run and if things go awry, you’ve got a partner at the table to support each other.
- Be transparent with each other – being able to trust each other will only increase the ease at which the project advances, as well as the overall success. Everyone should understand that the speed of business changes, so as long as everyone is on the same page there shouldn’t be a problem.
learning and development
WHAT GAME-BASED LEARNING AND GAMIFICATION CAN (AND CAN’T) DO

Lumos Labs, the maker of a suite of so-called brain-training games called Luminosity, has recently been ordered by the Federal Trade Commission (U.S.A.) to pay $2 million in damages. The reason? Lumos Labs’ aggressive marketing strategy is built around the false claim that its games promote brain health and can reduce or delay the impact of brain diseases such as dementia. There is no valid or reliable evidence – qualitative or quantitative – to support the claim that Luminosity causes improved brain health. And anecdotes, as compelling as they may be in advertising, are not evidence.
So what can game-based learning and gamification actually do?
Multitasking
There is some evidence to support the claim that gaming may improve our ability to multitask.
Researchers at the University of California, San Francisco have studied the cognitive ability of older adults, aged 60 – 85, as they complete sessions in a driving simulator called NeuroRacer. The complexity of the simulation increases as gameplay continues thus forcing players to multitask the more they play. The study has demonstrated that with practice, players can improve their ability to multitask and the effects can be felt in subsequent NeuroRacer sessions months after game-play.
It is unclear if these skills can be transferred to the real world.
Strategizing
A European study of 152 participants (of which 80 were female, 72 were male and the average age was 14) found a “robust positive association” between gameplay and physiological changes in the brain – these changes are related to higher-order activities such as decision-making, prioritizing and strategizing.
What does this mean? We may be able to leverage games and game elements to promote the development of complex decision-making processes that involve sorting through and prioritizing mass amounts of information.
Focus
Flying in the face of popular and often vocal alarm about video games and shrinking attention spans, a Bristol University study used neuroimaging to see gaming brains at work and found they remained focused throughout gameplay. How did they do this? Researchers had participants study in the conventional way (reading notes and reviewing sample questions) while viewing their brain activity. Then they had participants complete a gamified, competitive study session while viewing brain activity as before. The result? Learners were much more focused when study was gamified.
Implications for adult learning
So what does all this mean for Instructional Design and adult learning?
Do, not tell: Science does support the claim that we retain information better if we’re able to apply it immediately. Games and gamified learning, if designed well, can provide learners with genuine opportunities for application and feedback that would support the retention of new information and set learners up for knowledge transfer.
Remember your audience: Digital natives are, obviously, more familiar with games and game elements than those of us who were introduced to digital life via the Commodore 64 or the Atari. Using games and game elements for digital natives means you can streamline or dispense with cumbersome text-based instructions.
Design a fun experience: Learning solutions that incorporate game elements or adopt the game form should be fun. And if the learning is fun, odds are, you’ll find higher engagement, retention and completion rates. Capture and interpret the data and share the results.
If Luminosity has taught us anything, it’s that we must learn to be critical of grand claims about the effects of games on the brain. Yet despite the abundance of misinformation about the cognitive effects of gaming, it’s clear that games and game elements can be used to support learning. They’re powerful tools, not magic bullets.
GAME-BASED LEARNING VERSUS GAMIFICATION

Game-based learning and gamification are terms that are frequently used interchangeably so there’s little wonder that there seems to be confusion in the learning world about both, not to mention how to leverage them to build innovative and engaging learning.
So what’s the difference between game-based learning and gamification?
Game-based learning
Game-based learning is just that: Learning through games. These are fully-formed games, not game elements as you’ll see with gamification below. In other words, the game is the engine, or method of delivery for the learning. This is a great option for content that requires a high level of interactivity and can be shaped into a strong narrative structure.
Game-based learning can be linear or non-linear, tech-intensive or simple. What remains constant across all game-based learning solutions is its high dependence on learner activity and engagement.
What does game-based learning look like? I am eagerly awaiting the release of No Man’s Sky, a fully immersive simulated universe that encourages deep learning through experimentation and exploration. For a more linear example, Typing for the Dead teaches keyboarding skills so you can key your way to zombie annihilation.
Gamification
Learning is gamified when game elements are adopted to heighten learner engagement and build genuine interest in the content. Elements that encourage competition between learners (think of leader boards, trophies and badges), heighten curiosity and buy-in (locked and unlocked levels or hidden worlds), or encourage autonomy (exploration and non-linearity) are all game elements that can be adopted to gamify learning.
Despite common misconceptions, there are no technological requirements to gamification. Remember when your teacher put a gold star by your name when you got the highest grade on that quiz? That was gamification and it wasn’t tech-intensive!
What does gamification look like? Duolingo is my current favorite example. With badging, progress bars, opportunities for application, assessment and feedback, the learner establishes a solid foundation in a new language in ways that are challenging and fun.
Next steps
Inspired to adopt game elements in your next eLearning project? Or are you considering building an entire game to support it? Both game-based learning and gamification are fantastic ways to enliven your course and inspire your learners.
MAKING ELEARNING MOBILE
AN INTRODUCTION
It has become commonly accepted that if we re going to learn something new, we need to be at our desk to take an eLearning course. However, this doesn’t always have to be the case.
WHY?
There’s a shift happening and we believe in 2016, there will a major move to mobile learning this year. Organizations who can’t upgrade, or who are simply afraid to do so for financial reasons or security ones, will be left behind.
These days, however, a lot of time is spent taking eLearning at a desk. We can’t take out our phone or tablet, and take an employer’s eLearning courses or watch their instructional videos via our own personal device. A far cry from the access to information, most of us are accustomed to. Mobile learning is a very simple concept with it’s own set of challenges which are slowly being overcome.
We are seeing an increase in eLearning growth, but there has not been the same type of growth for mobile learning. For example, there has been an overall growth in the number of courses (eLearning) delivered either online (29.1%) or with a blended approach (28.5%) accounting for 57.6% of programs. There is an overall increase in eLearning or blended-learning adoption of 3.8% over the previous year. A trend that will continue, as more companies consider the instructor-less training approach or have a large mobile workforce.
This trend towards increased eLearning adoption, will also increase as data showing that millennials are accounting for an increasing number of employees overall. A figure that, by the end of 2014, was already at 36%. Millennials have a strong preference for on-line learning and their increase in the workforce will drive the need from just eLearning courses to eLearning courses that are available on their mobile devices.
WRAPPING UP
Pathways is one of the first vendors to launch mobile learning across Canada. If you would like to learn more about our mobile learning and eLearning, take a peek at our company website: Pathways Training and eLearning, at http://www.pathwaystrainingandelearning.com/. We always look for fresh ways to engage learners and to make the learning experience as fun as possible!
Sources:
http://elearningindustry.com/elearning-statistics-and-facts-for-2015
Programming tips: Modifying Storyline eLearning modules’ variables from Adobe Flash
As part of our series of tutorials, regarding extended functionality in Storyline by using Javascript and/or assets created in external tools, I want to jump in to a more advanced topic that will ultimately take our eLearning modules to the next level.
Let’s say you created in Adobe Flash a very fancy navigation bar with play, next slide and previous slide buttons, with some beautiful animations and states for the buttons that could hardly be done directly in Storyline, and now you are wondering how you will be able to actually control the module with that externally developed asset.
One option, and probably the simplest, is to import the flash object into your Storyline project and then cover the clickable areas with hotspots. While effective, because they will easily trigger the actions you want, this hotspots will also interfere with the states of your buttons, like the hover and clicked states. This happens because your hotspots are basically covering your Flash object and, in consequence, this object is not receiving any mouse inputs.
Another option is to have variables in Storyline that, modified by the Flash object, will drive the eLearning module, pausing and resuming the timeline, and going to the next or previous slide. In this tutorial, I want to show you how to achieve this by only using 2 variables in Storyline, that way we can also explore a bit more about triggers on the slides.
Just a heads up, since we will be using ActionScript 3 in Flash, we will have to do a bit more with coding compared to the first 2 tutorials.
Setting up the environment in Storyline
Let’s start by setting up the environment within Storyline, that way when we jump to coding in Flash, we will already know what to modify in our eLearning module.
The first step is to create 2 variables in Storyline that, as I mentioned before, will affect our module, pausing it or resuming it, and making it navigate to different slides. This variables could be as follows:
- pauseModule: This variable is a Boolean or True/False and its default value is set to False.
- navigateTo: This variable is Text variable and it’s default value is set to blank.
The second step is to create the triggers on the slide that will actually affect it. This triggers could be as follows:
- The first trigger should pause the timeline when ‘pauseModule’ changes to True.
- The second trigger should resume the timeline when ‘pauseModule’ changes to False.
- The third trigger should make the module jump to the next slide if ‘navigateTo’ changes to the value “next”.
- The fourth trigger should make the module jump to the previous slide if ‘navigateTo’ changes to the value “prev”.
- The fifth trigger should reset the value of ‘navigateTo’ to blank when the timeline of the slide starts.
Note: On the third and fourth triggers, the comparison to the values “next” and “prev” shouldn’t be case sensitive, that way we can ensure that inputs like “Next” or “PREV” have the same effect on the module.
Extending a bit further our work in Storyline, we can easily create a Master slide and implement this triggers in there, that way we don’t have to repeat this process n-times throughout our module.
Controlling our eLearning module with AS3
Now that we have set our variables and triggers in Storyline, it is time to go to Flash and create the code that will activate those triggers.
Let’s assume we have created 3 buttons and they are as follows:
- A play/pause button called ‘playPauseBtn’
- A next button called ‘nextBtn’
- A previous button called ‘prevBtn’
With that in mind, let’s create our code in AS3. In this part, I will explain each line of code so that we all have a clear understanding of what they do.
The first step is to import the libraries related to the events of the mouse (e.g. Click event) and related to the communication of our Flash object with Storyline.
import flash.events.MouseEvent;
import flash.external.ExternalInterface;
The ExternalInterface library will allow us to call Javascript functions that are external to our Flash object, and the MouseEvent library, will capture the mouse input on our buttons.
var playPause:Boolean = false;
var navigateTo:String = “”;
In the lines of code above we are defining the same two variables we defined in Storyline, the ‘playPause’ variable relates to the ‘pauseModule’ variable and will indicate whether to play or pause the timeline of our eLearning module; the ‘navigateTo’ variable will determine if the module has to navigate to the next or previous slide from the current slide. These variables will be modified by the functions linked to the following event listeners:
playPauseBtn.addEventListener(MouseEvent.CLICK, controlTimeline);
nextBtn.addEventListener(MouseEvent.CLICK, navigateNext);
prevBtn.addEventListener(MouseEvent.CLICK, navigatePrev);
In essence, an event listener, is a function that will be executed when an event happens, in this case, the controlTimeline function will be executed when the playPauseBtn is clicked, and the navigateNext and navigatePrev functions will be executed when the next or previous buttons are clicked, respectively.
Now let’s see how these 3 functions are defined, starting with the controlTimeline function:
function controlTimeline(evt:MouseEvent):void{
playPause = !playPause;
ExternalInterface.call(“GetPlayer.SetVar”, “pauseModule”, playPause);
}
We will take a more in-depth look at the structure of AS3 in a future tutorial, in the meantime, let’s understand what the previous function is doing.
Basically, what the contolTimeline function does is to toggle the value of the variable playPause between True and False, as explained on a previous tutorial (link to the first programming tips article), and then it executes our beloved Javascript function “SetVar” (please refer to the first programming tips article for a better understanding of this function) by passing the two necessary parameters.
function navigateNext(evt:MouseEvent):void{
navigateTo = “next”;
ExternalInterface.call(“GetPlayer.SetVar”, “navigateTo”, navigateTo);
}
function navigatePrev(evt:MouseEvent):void{
navigateTo = “prev”;
ExternalInterface.call(“GetPlayer.SetVar”, “navigateTo”, navigateTo);
}
And finally, the previous functions will indicate the eLearning module to navigate forward or backwards by changing the value of the variable ‘navigateTo’ to “next” or “prev”.
Before finishing the tutorial, let’s remember that this interaction can’t be tested locally within storyline and, as indicated on the first programming tips tutorial, we would need to make use of other tools to verify if our customized code is working.
If you want to know more about Javascript and ActionsScript 3 applied to eLearning or about how to use other tools, such as software for 2D or 3D animation to enrich the outcome of your products, don’t forget to visit our blog or our website at www.pathwaystrainingandelearning.ca.
Programming tips: Accessing LMS functions using the Javascript API in Storyline for eLearning modules
Continuing with the programming tips we started in the previous post, regarding how to write code in Storyline for eLearning modules, let’s continue this time with a little bit more of an advanced coding.
To summarize, we now know that our eLearning modules, when published from Storyline, come with a set of Javascript libraries that allows assets developed in external tools (e.g. Adobe Flash) to communicate with our modules and modify variables.
We also know about the reporting capabilities Storyline has, meaning that all the quiz questions you create in the modules, have the option to be graded and then reported to the LMS.
However, learning may not be as simple as creating slide questions with multiple answer questions, drag and drops or matching sequences, and sometimes we are required to develop this interactions somewhere else, so what happens when you want those interactions to be part of your eLearning module’s grade?
Well, thankfully we are able to manually report that score to our LMS, using Storyline’s Javascript functionality.
Storing the activities’ points and converting it to a percentage
Let’s say we have developed 6 interactivities in Adobe Flash and all of them send a point value to Storyline after they have been completed by the learner (This will be covered in another tutorial). To store this value in Storyline, let’s create 6 Number variables as follows:
- Activity1
- Activity2
- Activity3
- Activity4
- Activity5
- Activity6
And set all of them to a default value of 0.
Now, after all the slides with the activities, let’s create another slide that will work as our results slide, calculating the percentage achieved by the learner on the previous activities. On this slide, we can use a Javascript code that looks something similar to this:
var player = GetPlayer();
var act1 = player.GetVar(“Activity1”);
var act2 = player.GetVar(“Activity2”);
var act3 = player.GetVar(“Activity3”);
var act4 = player.GetVar(“Activity4”);
var act5 = player.GetVar(“Activity5”);
var act6 = player.GetVar(“Activity6”);
var scoreTotal = act1 + act2 + act3 + act4 + act5 + act6;
var percentage = scoreTotal * 100 /60;
Looks a little bit complicated? Well, let me explain it.
On the first 7 lines of code, we first get the Javascript API from the player and then get and store all the six variables containing the values reported by the activities. Then we have the following line of code:
var scoreTotal = act1 + act2 + act3 + act4 + act5 + act6;
In this line, we are only finding the total achieved by the learner after going through all the 6 interactions. Finally, we see this:
var percentage = scoreTotal * 100 /60;
This is just a simple ratio that allows us to translate the achieved points by the learner into a percentage. Let’s assume we have only 6 of these interactions and each one of them awards the learner 10 points if completed correctly, thus the value of 60.
If we do the math, let’s say the learner scored a total of 40 points, then percentage will be 66.7% (rounding up to the nearest decimal).
Reporting the score to the LMS
Now that we have the percentage we want to report, we can now report it to our LMS. Thankfully, Storyline allows us to communicate manually by providing a set of functions that we can use to report score or completion.
We achieve that by adding the following lines of code after calculating the percentage:
var lmsAPI = parent;
lmsAPI.SetScore(percentage, 100, 0);
What the previous 2 lines of code do, is that first, we get the LMS API provided by Storyline, and then we use the “SetScore” function to report the percentage to our LMS. If you notice, this function takes 3 parameters:
- The first value is the percentage achieved by the learner
- The second value is the maximum score that can be reported, 100 in this case, because we are talking about percentages
- And the third value is the minimum score that can be reported, 0 in this case.
After adding this Javascript code to your project, you can now rest assured that your elearning module will report a score, even if those values don’t come directly from Storyline, but they come from activities or interactions you developed in an external tool.
If you want to know more about Javascript applied to eLearning or about how to use other tools, such as software for 2D or 3D animation to enrich the outcome of your products, don’t forget to visit our blog or our website at www.pathwaystrainingandelearning.ca.
Programming tips: Writing code in Storyline for eLearning
There is always a time in our development phase where we need to add some extra fancy elements or interactions to our eLearning projects. Even though Storyline usually provides us with all the tools we need to produce our eLearning modules, sometimes it falls short on some of the things we want to do and then, we need to make use of other software, such as Adobe Flash.
However, and unfortunately for non-programming people, communication between those external tools and Storyline is not as straight forward as we would like it to be.
On the other hand, Storyline offers an API (Application Programming Interface) to help us while integrating interactions made on other software into our modules. This API consists of a group of Javascript functions that will let us retrieve and modify objects, usually Storyline variables.
I am aware that thinking about coding something in Javascript (or any other programming language) may be scary for some people, but I like to believe that regardless of the language, we can all code something, given that one of the most important things is logic, and as far as I am concerned, all human beings are logical, too.
In this article, I describe several tips that may help you use the Storyline API and even, introduce you to the coding world.
Avoid writing code whenever possible
As much as I love programming, I also love to avoid it when it is not necessary. It may sound contradictory, but before jumping into writing code and scratch your head for hours, make sure you have a legitimate reason to do it.
Usually, when you have to develop a module in Storyline, you have a reference, like a script or a storyboard describing all the interactions on screen (If you don’t have this, I strongly recommend you create a storyboard before developing a module), evaluate them and figure out if what you have to do is possible through the tools offered by Storyline.
There is a specific situation that I have experienced, in which I definitely use the Javascript API to enable my interaction, and this is, adding a button on the player to show a layer with closed captions when there is audio present.
Understanding the API
If you have decided to use Javascript on your project because you deem it necessary, or, well, because you want to try it, you need to understand how the API works, or at least have an overview of the things you can accomplish with it.
As I mentioned before, the API is a group of functions (provided by Storyline when you publish your module) that you can use to modify objects within the project, i.e variables. Yes, you can modify the value of variables using Javascript and (Spoiler alert) you can have triggers of actions happening when the value of those variables changes.
On the picture above, we can see a simplified version of how the API works. First, your Javascript code, will ask the API to retrieve the value of a specific variable from the Storyline module. Then, when that value becomes available to your code, you can modify it, changing its value to a different one or even making math operations if your variable is a number. Remember that Storyline works with 3 types of variables: Text, numbers and Booleans (true or false).
Once you have done everything you needed with that value, you can post or submit your results to the same or another variable that matches the type of your new value. To do that, you just ask the API to send that value to a specific variable within your Storyline module.
Creating the Javascript code
Now it’s time to actually write the Javascript code within Storyline to execute the desire actions.
Let’s say you have a layer that will show up when you click a button on the player (Like the resources button you can add). When you create this button on the player window, you have fewer options under the “Action” drop down menu as if you were creating an object directly on one slide. One of the options is to “Execute Javascript”. Once you create the action, you can edit the Javascript code linked to this button on a pop-up window that looks like a notepad.
The advantage of the API is that it is available right away when you create the action, meaning that you don’t have to “include” or “import” any programming libraries, like you would do with ActionScript 3 or C#, for example.
Let’s also say, that you have already setup a variable that will toggle the visibility of your layer, and it is called “myToggle” and it is a Boolean variable with a False value by default. The idea is that the layer becomes visible when myToggle changes to True and hides again when it changes to False (This is the logic you would use to create the triggers on the slide).
The first thing you have to do, is to make sure the variables are accessible from your Javascript code, and this is done by adding the following line of code:
var player = GetPlayer();
This line of code is simply creating a temporary variable that will retrieve and store all the functions that will help you modify variables within Storyline.
You can change a variable’s value by using the following line of code, if it’s a text:
player.SetVar(“myVariable”, “Lorem Ipsum”);
or if it’s a number:
player.SetVar(“myVariable”, 25);
The sintax of the “SetVar” function is very simple, the first parameter refers to the variable you created in Storyline and that you want to modify (This parameter should always be inside quotation marks), and the second parameter is the actual value you want to assign to that variable; if it is a text, the text should always be inside quotation marks, otherwise, if it’s a number or a Boolean, the quotation marks are discarded.
However, in the example we are following to create the Javascript code, we can’t really assign a value right away, since we first want to know if myToggle is true or false (if the layer is visible or not). To achieve this, we can use the following code to know the current value of myToggle:
var toggleValue = player.GetVar(“myToggle”);
The sintax of the “GetVar” function is even simpler than the “SetVar” function, it only needs one paremeter and it is the name of the variable you want to retrieve, always using quotation marks, and it is assigned to a temporary variable created in our Javascript code because, well, since we are retrieving a value, we need to store it somewhere.
Please note that this function, retrieves the value of the specified variable and not the variable itself, meaning that whatever we do with this value, doesn’t necessarily affect the variable within Storyline, unless we tell the API to do so (which is done with the “SetVar” function).
Now that we have the current value of myToggle, we can decide whether to change it to False or to True. We could use a conditional here, but in my experience it doesn’t work as well as the following code:
toggleValue = !toggleValue;
Wow, the previous line of code looks a bit scary, doesn’t it? Let me explain it (or a least try) so that it is clearer.
Since the value we just retrieved is a Boolean, meaning that we have either True or False, we can apply something called Boolean Operators, and in this case in particular, the exclamation mark preceding “toggleValue” is a negation of the value stored within that variable. This negation, simply changes the value between True or False depending on the current value, so if you say that something is NOT False, then it is true, and if something is NOT True, then it is false.
Looking at the line of code, without the name of the variable on the second half of the equation, and assuming that the current value is False, we would see something like this:
toggleValue = !False;
Which in common tongue, that line of code is read “toggleValue equals to NOT False”, so as a consequence, we are instructing Javascript to assign the value of True, because saying NOT False is the same as saying True.
With the line of code “toggleValue = !toggleValue;” we are ensuring that whatever the value we retrieved (true or false), it will always assign the contrary value.
Finally, after modifying the value, we need to send it back to Storyline and assign it the the “myToggle” variable. This can be done by using the function we reviewed earlier:
player.SetVar(“myToggle”, toggleValue);
The previous code is asking the API to assign the value stored in the variable “toggleValue”, to our variable in Storyline “myToggle”.
And with this, our layer should be showing up and hiding when we click on the button we added to the player.
Testing your interaction
Unfortunately, all the code we created on the previous section, is not available on preview within Storyline, because all the Javascript is blocked for security reasons.
In consequence, we have 2 different options (that I can think of) to test our customized Javascript code:
- We can actually publish our module and upload it either to our LMS or our webserver, that way it is possible to test our interaction live.
- Another option, if you don’t have a web server available nor a LMS, is to install a local server, like Xampp, and test it locally.
It could be a bit time consuming, but it is worth since the interactions created this way can improve the engagement of our modules.
I know using Javascript at first could be somewhat confusing or it could terrify you, if you are not used to code, but in the end it is rewarding to give it a shot when producing your eLearning modules.
Avoiding pitfalls of using multimedia in elearning
Many successful elearning courses use different types of media (ie: text, images, sound, video) simultaneously to generate interest and direct the learner’s attention around the content. However, using several forms of media together can just as easily create problems that counteract learner comprehension and make your content more difficult to absorb.
Two cognitive science principles that can help you understand when different types of media may conflict with each other are the Split-Attention Effect and the Redundancy Principle.
The Split-Attention Effect
The split-attention effect is a common problem that occurs when two sources of related information are presented separately – most often in the form of a diagram or other graphic and its explanation when the two are presented on different parts of the screen. This causes the learner to have to split their attention between the two sources, which can cause them to lose some of the information from each source as they try to process both at the same time, or switch their attention between the two. The effect is worse when there is a temporal component (ie: video) when information can go by while the learner’s attention is on a different part of the screen.
The best way to design for this situation is to integrate the textual component into the graphic or video it’s explaining so that the learner doesn’t have to process the information separately, or replace the text with properly synced audio. If the different types of media are integrated properly, that will cut down on the cognitive load required from the learner.
The Redundancy Principle
When using multiple forms of media, another thing to avoid is presenting the same information in multiple different mediums. A frequently occurring example is the use of text to explain a graphic at the same time there is narration doing the same thing. Learners may try to compare the information coming from different formats, and have trouble focusing when doing so. Also, the learners’ attention tends to gravitate towards text as it requires the most effort to process, which can cause them to miss information coming from the graphics or the audio.
Ideally, if the content can be presented with graphics and audio, you can do away with text altogether. Always keep in mind the cognitive demands you are placing on the learner with the content you are presenting, and streamline as much of your elearning as possible to reduce the amount of effort needed to process and understand the information effectively.
Adding Depth to Your Graphics in ELearning or Mobile Learning
When making graphics for your elearning or mobile learning module, adding 3-dimensional effects to your graphics can really help things pop off the page. This sort of design aesthetic can be found everywhere, even if it doesn’t call attention to itself right away. Drop shadows, gradient shading and textures all add an element of realism that will help your learner feel like there is physically a photo, a button or some other object in front of them, or that they are part of a real vignette. You can also use these techniques to call attention to specific parts of your image.
Drop Shadows
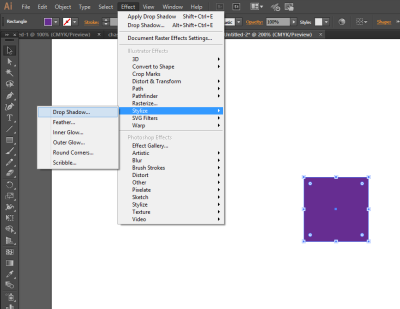
Adding drop shadows to objects in Illustrator is a pre-set effect you can apply to any shape. This gives the impression that your picture has a ‘thickness’ to it and is floating just a little above your page, depending on how far away you set the shadow.
Simply select the object you want to apply a drop shadow to, then select Effect > Stylize > Drop Shadow and it will give you a pop-up that lets you adjust and customize the direction, size, blur and colour of the drop shadow. However, if you are starting with a raster image, you’ll have to make an identically shaped vector object underneath the layer your raster image is on to apply the drop shadow to.
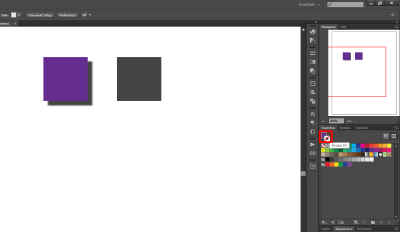
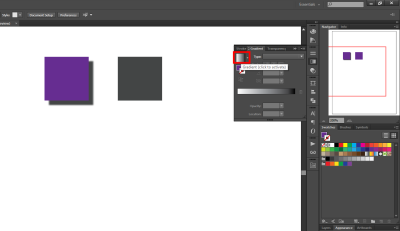
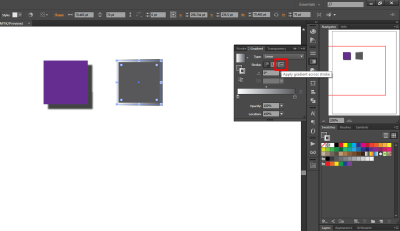
Another way to make a drop shadow is to use the above method of making a similar shaped object and giving it a stroke with a gradient fill across the stroke. In the Swatches panel, select the Stroke, and then select the White, Black gradient from the Gradient panel. Set the white option to 0% opacity. Also in the Gradient panel, select the Apply Gradient Across Stroke option. This gives your shape a soft edge.
Cast Shadows
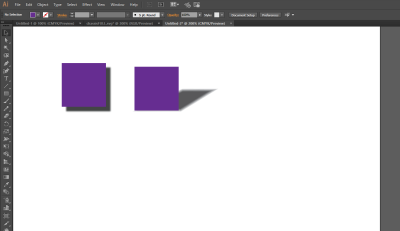
If you use the last option to create a shadow, you can take the spatial illusion a step farther by making the separate shadow object look like a shadow cast on the ‘ground’ away from the object.
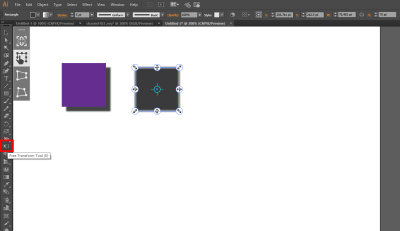
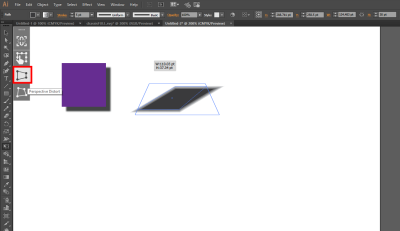
Select the shadow object and select Free Transform from the Tools menu. Click and hold on the handle in the middle of the top of the shape to drag it around. On the left side you can also select the Perspective Distort, which will give you the option to shrink parts of the object that are ‘farther’ away from you. Then add the original object back in on top of the shadow.
If you’re not familiar with Illustrator, you can get started with our previous post on using the program – A Beginner’s Guide to Working With Vector Graphics for eLearning Modules
INCENTIVIZATION
WHAT IS IT?
Whenever you’re engaged in an activity, there’s always that one factor that brought you there and the one(s) that bring you back may be the same, or things that came out of the activity after you did it. What we aim for in any learning module or gamified example, is to balance those factors to create the ideal incentives for users. Those little things that capture their interest, cause them to learn something new, or even build on the knowledge they’ve gained from doing the lesson. There is a threshold, however, that we need to be mindful of.
WHY NOT?
Whenever there’s an incentive applied to something, it’s worth investigating the outcome of that to see whether the users are getting too much of a good thing. A popular incentive, in the context of games, is leaderboards. A place where the highest scores are put on display.
Looking to the positive side of this incentive is that users are encouraged to do their best to be at the top for bragging rights amongst their peers. This is something that can also produce the unintended effects of cheating, or focusing more on the performance of that particular session as opposed to learning any lessons.
WRAPPING UP
In most cases, however, users are presented with proper incentives because they’ve been proven to be effective. There are also many other examples of how you can give incentives that you can explore on your own and see their impacts.
If you would like to explore more about gamification, mobile learning and eLearning, take a peek at our company website: Pathways Training and eLearning, at http://www.pathwaystrainingandelearning.com/ . We always look for fresh ways to engage learners and to make the learning experience as fun as possible!
