Creating Accessible eLearning that is 100% Compliant with AODA (Accessibility for Ontarians with Disability Act) eLearning Standards

In order to ensure that your eLearning course is accessible to everyone, you have to keep in mind the new Accessibility for Ontarians with Disability Act (AODA) act when designing your course and activities. The AODA act as it relates to eLearning, means that all learners, regardless of disabilities should be able to complete the same course and achieve the same objectives as fully-abled learners. Assistive technologies such as screen readers can help learners to access the content, but it is also important that your course is compatible with these tools, if you want your eLearning to be accessible and fully compliant. Put yourself in the position of someone using these aids to interact when designing and testing your eLearning and to ensure all learners will have the same experience.
Here are some tips to help make your elearning better for everyone to use, when building your accessible eLearning module in Articulate Storyline.

  1. Minimize the number of tab-interactable objects on screen. Turn off the tab interactivity of unnecessary objects.
  2. Where possible, keep colour contrasts in mind with regard to the different types of colour blindness that some of your learners might have.
  3. Make alt text to describe images and instructions for selectable objects.
  4. Have closed captions for all audio.
  5. Avoid interactions that require use of the mouse (e.g.: drag and drop activities).
  6. Make sure that navigation is clear. Use ‘select’ instead of ‘click’ for objects to be clicked on. Be descriptive and provide as much detail as possible.
  7. Choose a large, easy to read font for your text. Sans serif fonts are friendlier for learners with dyslexia. Recommended typefaces are Calibri, Myriad Pro, Century Gothic, Trebuchet MS and Arial, and they are all easily available.

The most important tool in Articulate Storyline for accessibility is the Tab Order function. You can find it in the Home menu, the second section from the left.

AODA1.1

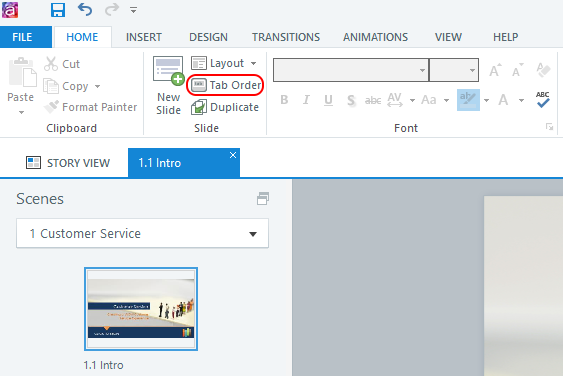
This will open a pane in which you can see and edit all the objects on your screen that can be tabbed to. Here, you can delete tab functionality from unnecessary objects, add alt text, and change the order in which items will be selected (aside from the player bar controls). Here is an example of a slide before and after editing tab functionality. I removed some of the background shapes, added alt text to the images, and moved all the images to the top of the tab queue.

To learn more about how to design accessible eLearning and the eLearning and technology training solutions offered by Pathways please visit our website at http://www.pathwaysinc.ca

Creating Accessible eLearning that is 100% Compliant with AODA (Accessibility for Ontarians with Disability Act) eLearning Standards

eLearning Gamification – Making use of tiling textures

When creating games for eLearning, you will often need to create game environments, creating wide expansive spaces.  To save on resources often game artists use tiling textures.  Theses textures are designed to align seamlessly when laid adjacently.  See the example below

brick texture

Sample texture

tiling texture                 Texture tiled horizontally and vertically


These tiling textures can be applied over a large space, whether it be floors, walls, or other complex models.

These tiling texture can be made using Photoshop.  Adobe Photoshop has a robust toolset for image manipulation and art creation. But to create tiling textures there is one tool in particular is especially useful.

From the main menu navigate to Filter>Other>Offset..filter texture

Here you can test the tile-ability of your image, to ensure it will align when the UVs are tiled on the 3D mesh.

offset1offset2

Using this method you can ensure you have hi fidelity textures, over a large environment, greatly increasing the quality in your gamification and eLearning pursuits.

If you would like to learn more about eLearning, and gamification please visit:

www.pathwaysinc.ca


eLearning Gamification – Making use of tiling textures

eLearning Gamification – Strengths of Virtual Simulation

Since the dawn of interactive entertainment, the then unattainable goal was virtual reality. But as technology advances and new innovations such as the Oculus rift, HTC vive, or Project Morpheus are bringing us closer than ever before.  But while a matrix like VR experience is still a long way off, the creation of interactive simulations has proven to be an excellent tool for learning and training for several reasons.

Greater retention of content

Thinking about the experience of an eLearning module vs. a video of the same content.  Assuming audio and visuals are identical to each, you will absorb more from an eLearning module because it involves interaction.  Without interaction the module cannot proceed. It is an active way of learning compared to the more passive example of video. User involvement automatically makes the experience more significant. This logic is what makes videogames such an immersive experience when compared to television or movies.

This same comparison can be made between virtual simulation vs. eLearning modules. Typically an eLearning module goes over the learning material and then eventually tests the user on it (in a similar manner to classroom learning).  But virtual simulations goes about learning in a more practical sense. Instead of being tested on content in a classroom setting, the user is thrust into the role. The virtual environment provides a practical learning environment which will help with the transfer of learning.  Studies have shown that learners recall 90% of information when simulations are used.

Untitled

* Source – elearningindustry.com

Taking part in a simulation teaches the user in a much faster way, not only because engagement equals significance, but also because the nature of simulations results in a quicker rhythm of feedback teaching the user through their mistakes at a faster rate.

If you would like to learn more about eLearning, virtual simulations and gamification please visit us at

www.pathwaysinc.ca

eLearning Gamification – Strengths of Virtual Simulation

Whiteboard Animation Tip

Nifty VideoScribe Trick

Typically we develop all of our Whiteboard Animations using Sparkol’s VideoScribe, and Adobe Illustrator. Assets are built using illustrator, are exported and then imported into VideoScribe.  Inside of Videoscribe settings are set such as: animation speed, entrance type and direction, pause and hold times, as well as transitions.  The final step is applying everything to the desired audio, which can be either background music, or specific voice over, to better explain the subject matter.

Overall these two tools make the processes quite enjoyable with very few hiccups in the pipeline.  However I would like to share a specific setting that could make everyone’s use of the software a little easier.

Intermittently when importing .svg files into VideoScribe I would get graphical errors on the vectors. The errors would be at random and I was unable to pinpoint which factors are causing the glitch.  After all there are a while slew of factors that make up an image/filetype that could be potential factors.

imageBut I found a solution that so far, is working consistently (knock on wood).  From Illustrator export your .svg and wait for the SVG Options dialogue box to appear.  Ensure that Embed is selected under Options and that Presentation Attributes is selected under CSS Properties.

See the image left, for a visual guide.

The setting indicated seem to perfectly correct the errors I was experiencing previously.


Take a look at a before and after from VideoScribe located below.


videoscribe

On left you can see the error that was occurring with my vector image.  It is worth noting that the error did not correct itself when previewed or published, and strangely the line size was also altered.  Regardless the solution posted has stopped this error for me. Hopefully it helps your workflow as well.

If you would like to see whiteboards animations that Pathways has created or to  learn about whiteboard animations check out www.pathwaysinc.ca


Whiteboard Animation Tip

Tips for creating 3D graphics within eLearning Games

3dStudio Max – Freeform Tools

The inclusion of high quality 3D art in eLearning games truly serves to elevate the overall aesthetic of the finished product. A tool which I find particular useful when developing assets is 3dStudio Max. Within this program, some features which I have found to be highly beneficial are the Freeform Tools. Personally, these tools have increased the efficacy of my workflow and thus better help me to create the target art outlined by the art direction.

Among my favourite 3DS Max tools are the 3 primary tools under the Freeform tab.

FreeformSlide

Upon selecting a tool you need to define a surface that the tool will work on. This surface can be the XYZ grid, or a specified mesh.  For this example the selected surface will be the XYZ grid.

Selecting a tool will allow you to execute several modelling functions simultaneously by holding ctrl, & alt, & shift in various combinations.xyz grid

Below you will see the subject, a simple box mesh that we
will use to test the Freeform Tools, and as mentioned above, the selected surface will be the XYZ grid.

box base

Step Build

The Step Build tool will allow you to click on a selected surface and place vertices freely, independent of existing mesh geometry.

STEPBUILD1

Holding the Shift Key will create polygon around the 4 nearest placed vertices. Holding the Alt Key will delete a vertex, and Alt+Ctrl will delete an edge.

STEPBUILD2

Extend

The extend tool allows quick manipulation of open edged geometry.  Looking at the plane we created before holding the Shift Key will allow you to quickly extrude edges based on the selected surface.

Holding Shift+Ctrl+Alt will allow you to reposition vertices based on the selected surface.

extend

Optimize

While using the Optimize tools, and holding the shift key, dragging one vertex to another will allow you to quickly merge vertices and ‘clean up’ your mesh.

optimize

Holding Shift+Ctrl, or Shift +Alt, will allow you to instantly remove and edge loop, or an edge ring.

These are among my favourite tools to use when creating 3D models for games using 3Dstudio Max. I find these tools especially useful for the process of retopologizing a model. In which the original model would be the selected surface and we could use these tools to create new geometry for the desired model.

I hope you enjoyed this short blurb 3D Tools. If you would like to learn more about gamification, eLearning, or on how gaming can be applied to learning visit: www.pathwaysinc.ca


Tips for creating 3D graphics within eLearning Games

Game Art Workflow – Texturing

Game Art Workflow – UVW Texturing

Doc-GameArtWorkflow-Texturing

Game Art Workflow – Texturing

Five Great 3DS Max Features

Creating 3D models may be tricky, but I thought I should share some of the more useful modifiers available inside of 3D Studio Max.

One: Symmetry Modifiersym

If a model is going to be symmetrical it would be a huge paint to model both halves organically, trying to ensure it is a perfect reflection on both sides. Typically in most 3D package software’s the user would model half of the model, duplicate, and mirror to create the flipped reflection, and then finally weld the model back together.

symdemo

3D Studio Max offers, a unique workflow that you can work with in real time.  Using the symmetry modifier, you can work on half of the model and see the result on the other half the model in real time.  When the work is done you can collapse the modifier stack, applying the changes to the base mesh.

Two: Shell Modifier

An extremely useful way to add dimensions to any polygon  shell
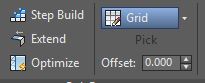
surface. The Modifier will extrude out from a flat shape. These extrusions can be set from either the inside or outside
of the desired face. I use this tool most often when I need to quickly extrude and add dimension to a complex flat shape.

Benddemo

Three: Bend Modifier

This tool is also great for doing just that, bending!  I most often bend
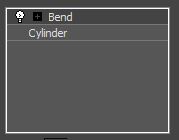
use this when I have complex geometry that requires accurate bends.  What I mean by this is that it the Bend Modifier allows you to set the Angle, Direction, Axis, and even threshold limits allowing you to create natural bends without kinks.  The user just has to keep in mind that the geometry will need to require the appropriate amount of edges in order for the mesh to bend realistically.

shelldemo

Four: Slice Plane

Under the Edit Geometry panel, you can find the Slice Plane Tool.  It is a very powerful tools sliceplane
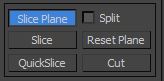
as it allows you to slice through your model across a plane. regardless of geometry, and edge loops it slices across the entirety of your topology.

Just be warned, that if used inappropriately it can lead to a messy mesh, with poor surface topology.

sliceplane demo

Five: Freeform>PolyDraw>Optimize

optimize

This is probably my favourite modelling tool in 3D Studio Max. It allows us to quickly weld vertices together on a model, cleaning up bad topology in a process that 3Ds refers to as Optimizing.

Using the Ctrl Shift and Alt keys the user can clean up their topology with unprecedented speed.optimizedemo

Hopefully you are able to find these tools as useful as I do.

Five Great 3DS Max Features

Game Art Workflow – UVW Unwrapping

Game Art Workflow 3D Modelling
TexTools

Doc-GameArtWorkflow-Unwrapping


Image

Adding Depth to Your Graphics in ELearning or Mobile Learning

When making graphics for your elearning or mobile learning module, adding 3-dimensional effects to your graphics can really help things pop off the page. This sort of design aesthetic can be found everywhere, even if it doesn’t call attention to itself right away. Drop shadows, gradient shading and textures all add an element of realism that will help your learner feel like there is physically a photo, a button or some other object in front of them, or that they are part of a real vignette. You can also use these techniques to call attention to specific parts of your image.

Drop Shadows

Adding drop shadows to objects in Illustrator is a pre-set effect you can apply to any shape. This gives the impression that your picture has a ‘thickness’ to it and is floating just a little above your page, depending on how far away you set the shadow.

Simply select the object you want to apply a drop shadow to, then select Effect > Stylize > Drop Shadow and it will give you a pop-up that lets you adjust and customize the direction, size, blur and colour of the drop shadow. However, if you are starting with a raster image, you’ll have to make an identically shaped vector object underneath the layer your raster image is on to apply the drop shadow to.

illus1

Another way to make a drop shadow is to use the above method of making a similar shaped object and giving it a stroke with a gradient fill across the stroke. In the Swatches panel, select the Stroke, and then select the White, Black gradient from the Gradient panel. Set the white option to 0% opacity. Also in the Gradient panel, select the Apply Gradient Across Stroke option. This gives your shape a soft edge.

illus2

illus3

illus4

Cast Shadows

If you use the last option to create a shadow, you can take the spatial illusion a step farther by making the separate shadow object look like a shadow cast on the ‘ground’ away from the object.

Select the shadow object and select Free Transform from the Tools menu. Click and hold on the handle in the middle of the top of the shape to drag it around. On the left side you can also select the Perspective Distort, which will give you the option to shrink parts of the object that are ‘farther’ away from you. Then add the original object back in on top of the shadow.

illus5

illus6

illus7

If you’re not familiar with Illustrator, you can get started with our previous post on using the program – A Beginner’s Guide to Working With Vector Graphics for eLearning Modules

Adding Depth to Your Graphics in ELearning or Mobile Learning

INCENTIVIZATION

WHAT IS IT?

Whenever you’re engaged in an activity, there’s always that one factor that brought you there and the one(s) that bring you back may be the same, or things that came out of the activity after you did it. What we aim for in any learning module or gamified example, is to balance those factors to create the ideal incentives for users. Those little things that capture their interest, cause them to learn something new, or even build on the knowledge they’ve gained from doing the lesson. There is a threshold, however, that we need to be mindful of.

WHY NOT?

Whenever there’s an incentive applied to something, it’s worth investigating the outcome of that to see whether the users are getting too much of a good thing. A popular incentive, in the context of games, is leaderboards. A place where the highest scores are put on display.

Looking to the positive side of this incentive is that users are encouraged to do their best to be at the top for bragging rights amongst their peers. This is something that can also produce the unintended effects of cheating, or focusing more on the performance of that particular session as opposed to learning any lessons.

WRAPPING UP

In most cases, however, users are presented with proper incentives because they’ve been proven to be effective. There are also many other examples of how you can give incentives that you can explore on your own and see their impacts.

If you would like to explore more about gamification, mobile learning and eLearning, take a peek at our company website: Pathways Training and eLearning, at http://www.pathwaystrainingandelearning.com/ . We always look for fresh ways to engage learners and to make the learning experience as fun as possible!

INCENTIVIZATION