Creating a Custom Hotspot Activity for eLearning using Flash

Here’s a quick look at how to create a cool Storyline-compatible hotspot interaction in Flash for an eLearning module. I recently wanted to make a pick-many activity where the user could select multiple keys on a keyboard. In Storyline, hotspot activities are weakened by the fact that only selectable objects have a hand cursor over them. I got around this by making a huge hotspot that covered the entire keyboard, and then putting the ‘correct’ hotspots on top of that one. This solved the hand problem, but made it impossible to have any hover/selected effects on individual keys. The user would have no idea which keys they had selected.

I know when to stop beating my head against a wall; Storyline just isn’t made for this type of complexity. This is a job for the Flash! The Adobe Flash, that is. I’m not going to go through the whole ActionScript3 code here, but I want to talk about the important part – the communication between Storyline, and the keyboard, which is a SWF movie.

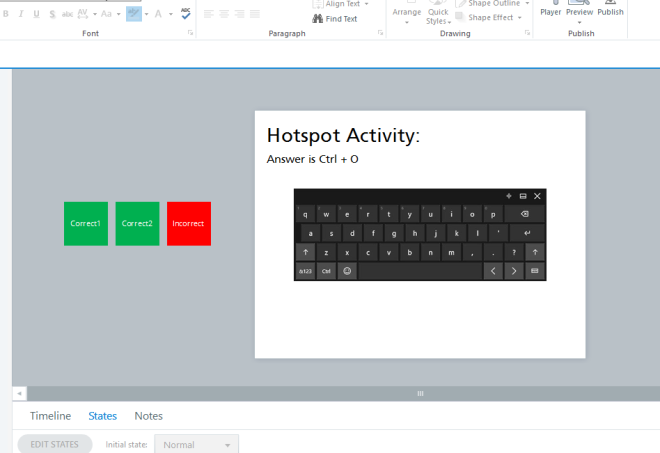
For my purposes, I want the activity to be marked correct when the user has selected both ‘Ctrl’, and ‘O.’ The activity should be marked incorrect if any other buttons are marked as ‘selected’ when the user submits the interaction. To accomplish this, I placed three buttons off-screen, and assigned them to be the hotspot targets – two correct buttons, one each for ‘Ctrl’ and ‘O’, and one incorrect button, which gets selected whenever there are incorrect keys selected.

These buttons are triggered by Storyline variables (in this case, True/False variables named ‘correct1’, ‘correct2’, ‘incorrect’). There are triggers which change the state of these three buttons, based on the state of the associated variables. When the user hits ‘Submit’ the state of these three off-screen buttons is what determines if the interaction is marked correct or incorrect. Here’s an example of what the slide looks like in Storyline:

capture.png

Okay, simple! So how do we adjust Storyline variables from a SWF movie? The answer can be found in this great article by Julio Ordonez. Here’s the short version, though. In your ActionScript3 code, call the following function to change a variable (in this case, we’re setting the variable ‘correct2’ to True):

ExternalInterface.call(‘GetPlayer().SetVar’,’correct2′, true);

The internal logic of deciding when to set each of your Storyline variables as True or False will be largely dependent on your particular circumstance. In my case, for example, I wanted my interaction to be marked correct only if two specific keys were selected, out of a possible 40 or so. I created an array to track all of the currently selected keys, and then iterated over the array on each mouse click, changing the Storyline variables depending on which keys in my SWF movie were selected.

The basic setup will remain largely unchanged, however. Simply hide your hotspots offscreen, and set their states via Storyline variable which are in turn set from within your Flash movie.

Here’s a working demo of the keyboard interaction.


Creating a Custom Hotspot Activity for eLearning using Flash

ADDRESSING RESISTANCE TO ELEARNING

Businesspeople sitting at conference table
SMEs and facilitators may resist eLearning. How are you addressing this?

If you’re expanding your learning strategy to include eLearning, you might be encountering resistance from your facilitators and Subject Matter Experts (SMEs). It’s important to understand the nature of the resistance so you can better address their underlying concerns.

Reluctant facilitators: Facilitators play a critical part in eLearning, in particular in the flipped and blended modes of delivery. Facilitators might be concerned that the inclusion of eLearning will increase their workload or radically change its nature. What supports or compensation strategies do you have in place to upskill facilitators in need and to compensate those who knock it out of the ballpark?

Resistant SMEs: Bringing knowledge and focus, Subject Matter Experts are the backbone of eLearning content; but their time is valuable. Are they actually resourced to develop eLearning curriculum or is your project piled on top of their daily responsibilities? Understanding how they are resourced will give you insight into your ability (or inability) to gain their buy-in.

Your approach to eLearning should include strong project management, focused meetings and a robust communication strategy. Your eLearning vendor should be able to help you generate stakeholder buy-in, explain the pedagogical value of new approaches, and manage project timelines and deliverables.

ADDRESSING RESISTANCE TO ELEARNING

TIPS TO SUCCESSFULLY PARTNER WITH AN eLEARNING VENDOR……..FROM AN eLEARNING VENDOR

  1. Share your priorities – make them aware of what your strategic priorities are at the time and if they can help they will. If they can’t help, then let them know what the bigger picture is and maybe they can help down the road.
  2. Let them help you build your internal business case – it’s very common in elearning that the learning and development team will have to “sell” the idea internally in order to get approval for projects so let the vendor help you! It’s only in their best interests.
  3. Act as collaborative partners – once you’ve reached a deal and have that contract signed, work as a team to achieve long-term goals and expectations. This will only pay-off in the long run and if things go awry, you’ve got a partner at the table to support each other.
  4. Be transparent with each other – being able to trust each other will only increase the ease at which the project advances, as well as the overall success. Everyone should understand that the speed of business changes, so as long as everyone is on the same page there shouldn’t be a problem.
TIPS TO SUCCESSFULLY PARTNER WITH AN eLEARNING VENDOR……..FROM AN eLEARNING VENDOR

eLearning Development – Creating Custom Buttons in Lectora

Creating customized buttons is something I consider an essential when designing visual elements in eLearning and or Web Based Training courses.

When using Lectora things can be a little different when compared to the industry standard authoring tool (Articulate Storyline). With that in mind I would like to outline the process I use for creating custom buttons inside of Lectora.

Lectora Custom Buttons

Below you can see the result of my custom button method, where we have the 3 primary states: Normal, Hover(Over in Lectora), and Down.

To begin from the Navigation Ribbon, select the INSERT tab, and then select Button>Image Button.

lectora ribbon

Next, use the drop-down menus to load your custom made images into the desired locations

load images

Lastly, build your images in the image creator of your choice, I use Adobe Photoshop. From to add a sense of volume I prefer using gradients on the surface of the design. For the Normal Button, ensure the gradient darkens at the bottom. For Hover/Over, I often remove the gradient, to give a sense of a lit state. And lastly, for the Down state, I use the original gradient but reverse the direction, giving the sense of a depressed button.

Lectora Custom Buttons-design

This method is extremely modular, as you can modify the Hues, apply textures, as well as custom icons, or custom text to make your buttons feel truly unique.

If you would like to learn more about eLearning development please visit www.pathwaysinc.ca

eLearning Development – Creating Custom Buttons in Lectora

Adventures in Facilitation Part II

Stress balls with many different personality
Stree ball office party with many oersonalities

One of the things I really enjoy (when the opportunity arises) is talking shop with other training professionals as I am always eager to learn what is new and exciting in the world of facilitation, instructional design and eLearning.   It was during one of these conversations recently that I was asked what led to me getting involved in professional training.   For many when this topic comes up the answer can vary to everything from… being involved in training and education was a childhood dream to …they were plucked from their office cubicle and dropped in front of a classroom when the facilitator was sick one day.  For myself the desire to get in to training was a bit different.  My epiphany came while I was attending what was probably the worst communication course that has ever been facilitated.    How bad was the program?  Here are a few highlights:

  • The facilitator gave all of the students a rubber ball at the start of the class and instructed them to toss the ball back to her when they had a question (as opposed to raising their hand) or to each other to acknowledge when there was a good point made.  It took all of 5 minutes for the room full of 20-something males hopped up on caffeine and Red Bull to start their own version of “face only dodge ball”.
  • One of the exercises called for us to learn how to handle a call when the customer did not speak English.  The facilitator then proceeded to play the part of the customer and walked around the room pretending to speak what we eventually determined was Chinese to each of the students.  Putting aside the grossly offensive part of this exercise, we were supposed to (a) understand what language she was pretending to speak (b) acknowledge it and (c) tell the customer we would have someone who spoke their native talk call back ASAP.
  • A student asked to be excused to use the facilities.  The facilitator agreed on the condition the student stood up and told everyone what he had learned so far.  This did not go well as the poor guy could not get anything out in between ducking rubber balls being fired at him from all directions, so finally he gives up and makes a run for it.   Although he never did answer any of the facilitators questions, considering how fast he bolted from the room I think one thing he did learn was to take it easy with the coffee and Red Bull next time.

I could go on with more examples but I am sure we all get the point…it was a tire fire, so much so that I left the classroom absolutely convinced that I could have done a far better job and thus had my motivation to get in to training.

Thinking about that day also brings up another point, and that is what clues are there to help identify the good training professionals from those that are less than proficient? Understanding that like   most professions, instructional designers and facilitators can come from all walks of life and experiences, there are key behaviors that I personally feel are an excellent indicator as to the quality of the training professional.  Here then are few that I look for.

Organization—A training professional is on time, comes prepared, can adapt quickly and can deal with setbacks without unnecessary drama.

Creativity—A training professional offers solutions when others offer a problem.   They are not shy to share an opinion and do not usually need to be encouraged to “think outside the box”.   A training professional will smile when someone says we need to try something new.

Personable—A training professional gets along with their peers.  They can easily carry on a conversation and are comfortable being called upon.  A training professional can gauge body language effectively, react accordingly and avoids awkward or uncomfortable conversations.

Communication—A training professional has above average writing skills and can easily articulate a point.  A training professional is an excellent listener and speaks in a clear and concise manner.

It is important to note that there are of course times when it is prudent to allow a designer or facilitator who has shown promise to work through the usual bumps in the road that can appear early in one’s career…. however, if you are ever in a classroom and a facilitator walks in carrying an arm load of rubber balls…. leave.

Adventures in Facilitation Part II

eLearning Development – Creating Patterns using Adobe Photoshop

As a professional I pride myself on my creativity, and I always try my best to always create visually interesting digital artwork. As a multimedia developer working in the training and eLearning industry this often manifests itself as the creating custom assets, designs and graphic elements that are used in Web Based Training modules.

An extremely, useful (and what I would call underused) feature of Adobe Photoshop is the ability create your own patterns which can be saved, to your own personal library which can be drawn from for later use.

The steps are simple:

1.       Create the base image of your pattern.

2.       Define as pattern

3.       Apply to elements when desired

Now I would like to walk you through these steps. Fortunately, they become less complex as we proceed.


Step 1 – Creating Your Pattern

The hardest part. This is the step where you use logic and plan out how you want your pattern to function. You will need to utilize your artistic and creative abilities to create the best result.

However, for the purpose of this demonstration, I will keep things simple. I will use a canvas that is 3×3 pixels.

See my pattern below, I magnified a great deal to make it clearer. You can see 3 white squares. Tiling diagonally down from left-to-right.

alpha pattern

Step 2 – Defining the pattern

define

Starting from the main menu, choose “Edit”, and then from the drop down menu choose “Define Pattern…”

naming texture

A dialogue box will now open asking you to enter a name for this newly defined pattern. Enter whatever you feel is appropriate and hit okay.

Step 3 – Applying the Pattern

The last step is applying the pattern to your desired element. In this example I will apply it to a button I made in a previous article. From the main menu choose “Edit” then from the drop down menu choose “Fill…”

button

A dialogue box will open and your newest pattern will be near last one in the list.

pattern menu

Select your custom pattern.

And Ta Da!

CustomButton

After reducing the opacity my pattern has been applied as intended, adding some texture to this button.

If you would like to learn more about eLearning best practices and development please visit www.pathwaysinc.ca

eLearning Development – Creating Patterns using Adobe Photoshop

ELEARNING AS A SUSTAINMENT TOOL

Regardless of what medium is used to train a topic initially, the end game should always be the same – the content is learned and STAYS with the learner. That means that whether you have ILT or deliver an elearning course, finding a sustainment tool is key. There is something called the forgetting curve that hypothesizes humans halve their memory of newly learned knowledge in a matter of days or weeks unless they consciously review the learned material.*

Over time, it’s highly likely that people will forget material unless there is some kind of sustainment tool to reinforce what was initially learned. eLearning is a very effective tool to use as it gives the learner 24/7 access to sustainment activities and all the original content that was presented. Being able to access content and refresh key topics will only give learners more opportunity to reinforce what they’ve learned when the forgetting curve kicks in. Even if you have ILT, you can follow it up with an elearning module that will give learners an opportunity to reinforce what they’ve learned in class.

*https://en.wikipedia.org/wiki/Forgetting_curve

ELEARNING AS A SUSTAINMENT TOOL

Designing eLearning graphics for colour blindness

Colour blindness, more accurately known as colour impairment or colour deficiency, is the inability to differentiate between certain colours. It’s estimated that about 8% of males and 0.5% of females are born colourblind. Colour blindness can also be caused by accidents (and other head trauma where permanent damage to the eyes occurs), or a number of diseases.

Colour blindness comes in three main types:

  • Red-green colour blind (difficulty with differentiating red and green hues),
  • Blue-yellow colour blind (difficulty with differentiating between blues and greens, and between yellows and reds), and
  • Total colour blindness (also called total monochrome vision).

Red-green colour blindness is the most common, affecting about 95% of all colour blind people, while the two remaining types make up the remaining 5%, and total monochrome vision is extremely rare.

As a designer, we don’t have to go farther into the science of how colour blindness works or its causes, but if we keep in mind the most common problems with colour impairment we can avoid designing graphics that are difficult for people with this problem to see.

what this means for your designs

In general, most colour blindness affects how many different shades of a colour a person is able to perceive, and can also cause confusion between two different colours with similar shades. ‘Safe’ colour combinations are red and blue, or yellow and blue. Best practices would be to avoid using colour coding, colour shifts and colour contrasts to differentiate information.

For instance, a common use of colour shift is on hover effects. A button that changes colour when hovered on may not be easily read by a person with a colour impairment. However, just about everyone can perceive changes in brightness just fine regardless of their colour vision, so an effective hover state would be to change it to a much brighter or darker colour than the original. Adding another type of visual cue such as a stroke, drop shadow, reflection or something else to make the visual difference stronger helps users with regular colour vision as well.

To learn more about how to design accessible eLearning and the eLearning and technology training solutions offered by Pathways please visit our website at http://www.pathwaysinc.ca

Designing eLearning graphics for colour blindness

eLearning Development – Dynamic workspace

In modern age we live in, the general population is very much aware of the negative results of a sedentary lifestyle. In response to this there has been a growing trend in the computer using office dwelling community. What I discovered was people utilizing standing computer desks, which is a logical choice for people trying to get away from being seated for 8 hours a day.

But there is one glaring flaw with a desk that is made for standing, and it is the most obvious flaw. You can’t sit and work (unless you have a booster seat).  Anyone who has ever worked in a factory or labour type job, will attest that 8 hours on your feet also isn’t ideal.


For me the logical balance that we need is strike a balance between the two states, which brings me to the namesake of this article. I believe a Dynamic Workspace, one where you can freely transition between the two states will be the most optimal offering the best of both, and non of the flaws.


The obvious benefits of a Dynamic Workspace to me are listed below.

  1. It helps to keep your workday from being fully sedentary by offering standing positions, and when your feet begin to feel sore you have the option of switching to a seated position as well.
  2. It helps to regulate your posture, and encourage muscular engagement.
  3. (this one is personal) You are less likely to feel that afternoon fatigue that comes after lunch, and.
  4. It boosts mental performance through, the simple change of going from seated to standing and vice versa.

T24F58C3900000578-0-image-a-9_1421968276142ruthfully this type of workspace lifestyle was demonstrated to me by a colleague, and he really sold me on it. Part way through his day he would get up from his desk and move his laptop bookshelf. The top of the bookshelf, and his height, happen to perfectly coalesce and, voila! A makeshift standing desk.

However not everyone’s workspaces have enough room for two pieces of large furniture, or on the flip side not everyone’s workspace is as small a single laptop.

Through some thorough research I have stumbled upon a few options for those who want to create a dynamic workspace.

There seems to be generally two different options, one where the whole desk increases and another in which a rig sits on top of a standard desk. The various options have a variety of prices, but generally it seems to follow that old notion of, you get what you pay for.61L7oS5bh6L._SY355_

If you would like to learn more about eLearning please visit www.pathwaysinc.ca

eLearning Development – Dynamic workspace

Adventures in Facilitation

Massage therapist standing by massage table with hands crossed
Massage therapist standing by bassage tavle with hands crossed and looking outside the window

Growing up I had a cousin who seemed to have a knack for being in the wrong place at the wrong time, so much so that whenever he came to visit us my Father would often remark “trouble just seems to follow that kid”.   I feel the same way when it comes to attending an in-class training session…. if there is a bad facilitator out there, I seem to end up as one of their students.

  Now, understanding that with the advancements in eLearning the need to attend a course or info session in person grows more infrequent by the day, these negative situations occur far too often.  Case in point, recently I attended a 2-hour info session designed to provide training professionals the opportunity to hear from programmers and see first hand some new opportunities in e-learning design.   While I was fine with the content of the program and actually thought the material was very well developed, the issue I had was with the person running the session.  Let’s pause for a tip…if you are running a class and want to “warm-up” your audience, there are several ways to accomplish this goal that do not involve asking the class to stand up, turn to their right and massage the shoulders of the person in front of them.  Tip number two…if a person is not comfortable groping the complete stranger they have been sitting beside for all of 5 minutes, do not call them out and ask why they are not participating…that discussion will in most cases be more than just a little awkward.   Anyway…I could go on and provide a few more examples of the above mentioned train wreck but the point is this…I left the room (early) wondering who in their right mind thought this gentleman was qualified to facilitate training?

Consider the scenario above for a moment longer.  Think about the hours, days, weeks and months a team of designers and programmers put in to creating slick pre-course materials and in- class activities that really showcased eLearning opportunities.  Now imagine handing over the finished product to a facilitator who, based on his lack of understanding for the material was not part of the design, and watching in horror as your team’s months of hard work goes up in smoke while this same facilitator spends far too much time on ridiculous “ice-breakers” or fumbles through the agenda as opposed to presenting the material as designed.  In these situations, do we blame the facilitator or the person that put them there in the first place?   In my opinion there is no easy answer to that question as there are too many variables to consider, however I do know this…when a facilitator claims to have years of experience teaching a plethora of subjects my expectation is they should be very good at their job, and thus assume the project leader would feel the same way.  I also know that in situations where the designer is also the facilitator OR the facilitator has instructional design experience, the chances of a successful program are increased drastically.   The reasons for this are straight forward, if not obvious.  A trainer’s familiarity with the materials, concepts, key objectives, timing, etc.  are a given when a facilitator trains a program he/she designed, and as such there are far fewer opportunities for failure.   Also, in situations where a facilitator did not design the program they are training however does have legitimate instructional design experience none the less, they are much more likely to focus on the key program objectives and consequently offer a greater opportunity for success.  To this end I would offer a final tip, that being if you are looking to hire an instructional designer, ensure you select an individual that has experience in facilitation.  The same recommendation would work in reverse.  If you want to hire a professional facilitator, find one that has instructional design experience. 

With regards to my own facilitation techniques I by no means have run a perfect session each and every time, and in fact am often reminded of a few of my “greatest hits” which include accidently slapping a student (a high-five gone horribly wrong) and setting a table on fire in class as part of a demonstration (that one is a story for another day).  Having said that I do however pride myself on ensuring I cover the key objectives, pay attention to my students and do my best to send everyone home happy…and until the day I am hired to work in a Spa, will leave the massages to the professionals. 

Adventures in Facilitation