How to good instructions write


Steps Instructions 1 2 3 Bulletin Board Sticky Notes

This morning I was browsing my “Home” screen in LinkedIn, looking for motivation for a blog posting I needed to write that was long overdue. (I find that when stuck for a topic to discuss, seeing what those in my Network are commenting on can sometimes get the creative juices flowing) For about 10 minutes I browsed a few articles and postings, choosing to ignore the mathematical challenges as I already know from last week’s quiz I am a smarty pants, and as well bypassing the motivational poster postings as I have not forgotten it is important to be nice to customers.  And then…. A posting from a 2nd connection in my network that enticed me by proclaiming I was one click away from previewing an interactive learning demo.  The posting included a few instructions which I reviewed and then, my curiosity perked, I selected the link that was labeled “demo” and that is where my interest ended.  Immediately I found out the demo would not work with certain types of browsers, and even the supported versions would need a special update.  Another link offered help, but that only directed the user to a generic Java page with no special instructions on how to resolve the issue.  I went back to the starting point to review the instructions again; certain I had missed something as the browser I was using is very common.  Nothing was missed.  Seeing enough, I closed the open screens as I had all the motivation I would need for this week.

Writing clear instructions is not difficult.  In fact, in my opinion it is probably one of the easiest tasks an instructional designer or program manager can be asked to complete.   There is however one caveat that appears to get overlooked more often than not…and that is does the author of the instructions know how to do the task he or she is documenting?  In the example I mentioned above, my guess is the author never actually tried to view the demo through the website, and instead probably had the files saved on his computer and tested it there.  I am equally confident the “Help” link was put in as an afterthought, again with no further testing.  I could add a few more examples here but the point is this…when the author put pen to paper, he was flying blind…and it showed.

The learning demo example I discussed above is just one example.  I am sure just about everyone can think of at least 1-2 examples where they were left frustrated and angry as a result of not being able to follow provided instructions to a successful conclusion.  Worse, we feel dumb that we are not able to follow the steps that (we assume the author felt) were clearly laid out for us.  Electronics, furniture, software…even board games…all of these items often come packaged with instructions that for lack of a better word…. just suck.  For myself, I cannot help but get frustrated and upset since as I have already mentioned, writing a step by step guide is not that difficult, so when I see poor instructions I am left with the feeling that the author (or manufacture) thinks very little of the people buying their product, and probably also has long since come to the realization we will eventually figure out what to do.

So, with that said here then are what I would consider a few simple tips for writing instructions:

  • Make sure you know what you are talking about.  If you cannot do the thing you are asking others to do, or worse have never tried, you are setting yourself up to fail.  Having a poor understating of the process will in all likelihood manifest in to instructions that lack detail in key areas and fail to highlight where special attention is needed.
  • Start with the required tools. If the process you are detailing can only be completed using specific tools or other pre-requisites, mention these first.
  • Highlight any pre-conditions. Does the process need to be completed at a certain time of the day, only through a specific website, on a flat service, etc.…
  • Keep the instructions short. If an explanation is running too long, make it in to two or three different steps.
  • Be clear and concise. Tell the user what they should see and what to do if something does not look right.
  • Identify and detail the help process. Provide instructions on how to get help if required, ensuring the steps are up to date and accurate.
  • Describe what success looks like. Regardless if you are telling someone how to build a futon or install new software, ending with a description of what the final result should be or identifying how to know a process was successful is always a good idea, even when the final result is obvious.

That’s it for now.  Almost time for me to get back on my home page and see what’s going on….I might even try one of those math riddles.


How to good instructions write

Common Project Management Problems and Solutions

It is not uncommon for one to be involved in multiple projects at the same time with varying levels of complexity and scope. Effective project management will help with avoiding issues throughout a project and here are common issues that can occur, as well as how to tackle them.

Assigning the wrong person to manage the project

Before a project begins, a Project Manager will be tasked with the job of managing the goals and expectations of the project. The person who occupies this role will be accountable for ensuring the overall success of the project. Thus, it is important to consider someone whose skill set corresponds with the requirements of the project.

Insufficient buy-in from project members

If project members are not on board with the project requirements, the rate of overall success inevitably declines. To increase buy-in from project members it is imperative that reasons for, benefits and risks of the project are clearly communicated. As well, when people have a clear understanding of their roles within the larger picture, they are more likely to want to actively participate in the process. Facilitate communication channels with project members at all steps of the project. Setting up regular meetings can be effective to keep the project on track. Encourage project members to voice any concerns or potential issues ahead of scheduled meetings.

Taking on multiple projects at the same time

Everything cannot be done at the same time and some tasks will almost always have to take priority over others. The same rule applies to projects. If there are one or two major projects for which you require some of the same project members, be cognizant of their capacity and the roles that they play within various projects. Overloading members with tasks can lead to work that is of sub-par quality. As well members may become disengaged from the project which works against the buy-in principle.

Not being specific with the scope of the project

Too much or too little flexibility can negatively affect the realization of a project. As much as possible, define the scope of your project from the outset and monitor the project regularly to make sure your team is within the scope.

Not having a clear standard for defining success

From the inception of a project it is important to clearly define the expected end goals. Outlining expectations will assist with setting up timelines and with the general planning around resources. For the project manager as well as members, having a well outlined plan truly makes the execution process on projects flow smoothly.

Common Project Management Problems and Solutions

Bolstering Your Craft – Digital Art Forums

A wise person once told me an artist is only as good as his craft. And in the competitive workforce of our time, I personally feel this statement does ring true. So how does one strive and make improve their skill? Just like a medieval swordsmith would slam beat after beat, and polish a steel ingot into a fine blade, just the same you need spend, hours beating on and perfecting your craft.

This logic strongly correlates with Malcolm Gladwell’s 10,000 – Hour Rule. Which states that 10,000 hours of deliberate practice will lead to world-class proficiency in any field/skill.

But with that in mind there is an inherent difference between working hard and smart. If we take the example of a visual artist, it would be quite easy for someone to spend 10,000 locked in a room and just draw/paint, and given enough time they very well could become exceptionally skilled. But we should also consider the alternative. Suppose the visual artist, instead finds and seeks a mentor who is already master to teach them. Becoming the apprentice of a master and learning/acquiring skill exponentially faster.

To me, this is the difference between:  working hard vs working smart, working blind vs working focused, working in the dark vs working in the light.

However, in the fast paced world of today, it’s a little difficult and a more than a little expensive to find a master to teach you in a 1-1 learning environment. That being said, a great alternative is a peer critiqued learning environment.

This is where for me (a digital artist) digital art forums are so useful. In these various forums there are industry professionals, old veterans, students, and up & comers. And they are all there with the same goal in mind. To put forth art into the community, give & receive valuable feedback, to stay inspired & focused, and to improve.

Below are a just a few of the digital art forums, I frequent. I highly recommend checking them out, and if you’re feeling inspired and have in mind the goal of artistic improvement I encourage you to create an account (it’s free) and start putting forth your best.

http://www.conceptart.org/forums/

http://forums.cgsociety.org/

http://polycount.com/

http://www.gameartisans.org/forums/forum.php

http://forums.3dtotal.com/


If you would like to learn more about eLearning development, please visit www.pathwaysinc.ca

Bolstering Your Craft – Digital Art Forums

eLearning Development – Tools for 3D Asset creation

As new software and technology is always being developed, it seems as though I am constantly being referred to new 3d art tools. I am well familiar with the old adage of: The tool is only as good as the hand it is in. But for the 3D art scene, if feel the statement is at least a little less true.

While it still does hold weight, there are some restrictions that come with rigid software, that just do not exist when doing practical traditional art outside of the computer.

For a quick example of what I am referring to we can look at Autodesk’s Maya, and Pixelogic’s ZBrush. Now while both are not new, ZBrush is a far newer software, and was released and became a favourite tool among artists because of they decided to essentially be more artist friendly. Creating a toolset that would allow users to sculpt shapes as if it were clay, as oppose to the standard set by software’s like Maya that involved pushing and pulling vertices, creating edge loops, smooth modifiers.

In essence they tilted the perspective less on the technical, and more towards the artistic.

A new software that was referred to me is Allegorithmic’s Substance painter 2. Which is posed to unleash artists and allow them to quickly create powerful materials and textures for the 3D models.

More info on Substance Painter 2 check here: https://www.allegorithmic.com/products/substance-painter

I have spent a little bit of time dabbling with the software and while I have not used enough to pass judgement or make a formal review, I can say I am very excited by the prospect of what this software could possibly allow me to produce. (And it doesn’t hurt that it speeds up my workflow).

They have a free trial on their site, I strongly urge the download if you are an artist looking for a more organic way to bring your 3D models to life. And let me know what your opinion and experience with substance painter 2 in the comment section below.

Happy Asset Creation!

If you would like to learn more about eLearning development, please visit www.pathwaysinc.ca


eLearning Development – Tools for 3D Asset creation

Learning Trends 2016

Advances in technology have over the past few years served to shape the way in which learning is created and delivered across various mediums. Particularly with the ease of access to smart phones, tablets and laptops, how information is disseminated to learners is constantly evolving.  Learners prefer information to be delivered in quality chunks that are easy to understand and that minimize the time spent. Learners by their preferences therefore influence the future of learning.

Here are some learning trends to look out for within the next few years.

Augmented Reality

  • Augmented Reality applications are created by imposing digital information unto physical infrastructures
  • Wearable learning is gaining popularity in the market (e.g. smart watches for fitness tracking and health monitoring, Google Glass)
  • The Augmented Reality market is growing at a rate of 15% per year. By 2018 it is estimated to become a $1 billion dollar business. (Source: Markets and Markets March 2014 report- Augmented Reality and Virtual Reality market.)

LMS Hosting

  • The LMS market is expected to grow to an $8 billion dollar industry by 2018 (Source: Markets and Markets)
  • A recent survey found that 59.9% of organizations chose to house their LMS on a vendor site, while 33.5% chose to house it on-site, and 6.6% chose a third party.
  • Vendor support is ranked highest among reasons for switching to a vendor site. (22.9%) (Source: Brandon Hall Group, LMS Trends 2015)

SHIFT to HTML5

  • Device agnostic learning (responsive design) is becoming more popular. Learners want the flexibility to access content on various devices with more ease.
  • As a result, Flash usage has decreased by 25% and there has been a shift to HTML 5.

These trends are highly driven by developments in new technologies created to improve the efficacy of how learning is delivered. As well, advancements within the field are quickly evolving the way in which learning is approached within various sectors.

Learning Trends 2016

SCORM: Clients want it. Vendors can provide it. What is it?

Abstract stamp or label with the text Standards
SCORM is a set of standards which allow eLearning content and LMSs to cooperate.

Most RFPs specify that SCORM compliance is obligatory. But what is it and how does it impact an eLearning project? SCORM or Sharable Content Object Reference Model is a set of standards to ensure interoperability, reusability and communication between eLearning content and Learning Management Systems (LMSs). Instructional designers should have a basic understanding of what SCORM is and how it could impact designs.

But first thing’s first: What does SCORM actually do?

Interoperability

With so many authoring tools and component parts, there are many ways to develop eLearning content. What if you designed an amazing library of eLearning content only to find that it didn’t cooperate with your new LMS? SCORM ensures that eLearning content and Learning Management Systems seamlessly coordinate, or are interoperable. This means that regardless how your eLearning content is authored, if it is SCORM compliant it will work the same on any LMS.

Reusability

Now imagine that you are responsible for providing training to five distinct sets of learners. Let’s also imagine that you have eLearning content – say an activity – that would be valuable to three of those five sets of learners. It would make your life infinitely simpler if you could make that activity available to those three sets of learners only. SCORM enables the reusability of eLearning content such as your activity. This means that it can be removed from the original module and reused in another for different groups of learners.

Communication

Now let’s say that the activity you just shared with those three sets of learners is only truly critical to one set, while for the other two the activity is a nice but not critical addition. Because you’re responsible for ensuring the training sticks, you want to know who among that one set of learners has completed the critical activity. SCORM enables communication between eLearning content and your LMS. This means that when learners in that one set complete the activity, that information is communicated to the LMS and is thereby made visible to you.

Impact to project

Most rapid development tools produce SCORM compliant solutions in a reasonably pain-free way and all LMSs are now SCORM compliant. The biggest impact to projects, from my perspective, is how to optimize SCORM.

Taking the bigger picture of your eLearning content into account is critical if you’re considering reusability of those Sharable Content Objects (the SCO of SCORM). The bigger picture involves understanding the learning objects you have, how they might be reused and who might gain value from them. This is a curriculum- and program-wide view that is directed by learner needs and would be considerably expedited though the use of a viable content management strategy involving curricular evaluation targeting performance gaps. But Instructional Designers will caution you that reusing learning objects (like that activity for your three sets of learners) introduces the risk of confusing or disengaging the learner because activities and content must be relevant and are therefore often context-bound if they are to be meaningful and helpful.

Then there’s the issue of the communication of learner progress. Many clients want insight into learner progress and so will ask for all learning objects to be SCORM wrapped. An eLearning consultant will ask about the feasibility of actually using that information in a meaningful way. Visibility can be a good thing, if you have the resources to make use of that information by, for example, offering coaching or supplementary learning opportunities to those who disengage or underperform. But visibility becomes a millstone around the necks of overworked administrators who have to juggle the competing priorities of administering, evaluating and maintaining learning programs. An eLearning consultant will be considering your human capital alongside your need for visibility.

For more information on SCORM, I encourage you to read, To SCORM or Not to SCORM by my colleague, Julio Ordonez.

SCORM: Clients want it. Vendors can provide it. What is it?

eLearning Development – Dealing with eye strain and fatigue

Programmers often find themselves working for hours at a time, working on tasks such as, coding, building modules, setting interactions, and building graphics.  Often  because we get so caught up in the momentum of tasks, and at other times it is because we work in fast paced work environment that ensures we deliver on client timelines.

But just like anyone who works in an office or studio, we all spend a majority of our day staring at monitors, and it is critical that we take special care to reduce eye strain and ocular fatigue.

To alleviate strain there are 5 tips that I have implemented into my work habits that drastically improved how my eyes feel at the end of my work day.

  1. Dark shaded themes

Some applications (Microsoft Office and the Adobe Suite) offer different color themes that will re-colour majority of the UI.  Switching to a darker theme really helps reduce the stark bright light produced by your monitor when applications are in use.

  1. Control the lighting of your work space

The lighting setup in your work space can absolutely alleviate strain and fatigue. Be sure of 2 things. That you have an adequate amount of light in your work space, because it helps reduce the contrast from the light produced by your monitor. Secondly, to position your lights/screens to minimize sharp glares.

  1. 20-20-20

Essentially referring to exercising your eyes. The example above means to every 20 mins, look at something 20 feet away, for 20 seconds. However all forms of eye exercise throughout the day would be extremely beneficial compared to none.

  1. F.lux

Applying science  of colour temperature and brightness, f.lux is a computer software that adjusts the colour temperature of your monitor to reduce strain throughout the day.

https://justgetflux.com/

  1. Computer eyewear

Using the same science of colour essentially, that blue light waves are sharper and more straining on your eyes to deal with. Various outlets have created eyewear that cuts out the blue light waves.

If you would like to learn more about eLearning development please visit www.pathwaysinc.ca


eLearning Development – Dealing with eye strain and fatigue

Core Skills for Effective Project Management

Project management can be quite a complex task with many moving parts to manage. Their roles can be deconstructed into multiple roles that include initiation, planning, design, execution, monitoring and closure of a project. as a result, PMs often have certain skills that enable them to be successful in the coordination of the projects they oversee. Here are a few key skills they excel at.

Excellent Communication Skills

It is imperative at the start of any project to clearly communicate project goals and expectations to all parties involved in the project. Effective PM’s are able to manage member feedback while ensuring that although all feedback may be taken into consideration, only suggestions which enable the project to move forward are put into practice.

Effective Team Building Skills

A successful project manager has the ability to inspire the team to work towards the end goal of the project. Ensuring that all members’ opinions are valued helps to create an environment where the vision of the project can be shared and where members truly feel that they have an equal role in achieving the desired outcome.

Mitigate Risk and Manage Problems

Being able to predict and create solutions to issues before they arise, increases the likelihood of an on-time and fruitful project. Preparing for worse case scenarios can prove to be an advantage even if things go as planned. If problems do arise, having a manager who calmly and collectively is able to manage issues serves to increase member trust and keep the team on task.


  • This program won a Canadian eLearning award and was voted the best responsible gambling program globally
  • 6 different LMS’s involved
  • Development of an online portal and 3 eLearning modules (a core eLearning module and 2 sustainment modules to be taken 60 and 90 days after the initial module had been completed)
Core Skills for Effective Project Management

Time-Saving Storyline Tips and Tricks

Here’s a few of my favourite tips and tricks. Keep these in mind when you’re designing your next eLearning module, and they’ll definitely enhance your productivity!

Transitions

The Transitions panel at the top of the Storyline can be used to adjust the transition between any two screens. This obviously includes between slides, but it can also be used to transition between layers! This can be a great time-saver, if for example you’re using layers to overlay text or images on the base layer. Instead of applying an animation to each element in each layer, you can simply add a single transition to the entire layer. You can select “Apply to All” in the same panel to apply your transition to all layers in your slide.

“Format” dialog shortcut

This one is a beauty, and a real must-know for Storyline users. Select any object on your slide and hit Ctrl+Enter to bring up the Format dialog. This saves a ton of right-clicking!

“Size and Position” dialog shortcut

Hit Ctrl+Shift+Enter to bring up the “Size and Position” dialog. Another neat tip here is that Storyline will remember the last edited parameter, and will automatically bring the focus to the same spot when you re-open the dialog, which saves you even more clicking if you use this to your advantage.

New Textbox shortcut

Everyone knows that Ctrl+T gives you a new textbox, but did you know that you can set the textbox’s position on your slide before you create it? Simply left click on the slide where you want your textbox to be created, then hit Ctrl+T. The top-left of the textbox will be at the click point.

Take advantage of trigger order

This tip takes a little practice to get used to, and it varies for each situation, but it is generally more efficient to let your slide triggers work together, if possible, rather than duplicating functionality (and complexity) between them. For example I recently wanted to show a warning layer if the user tried to advance to the next slide without visiting all the required links. To do this, I let triggers fall through each other, so that I only had to actually program one of them. Here’s what my two triggers looked like:

  • Jump to next slide when use clicks Next if … (all links visited)
  • Show warning layer when user clicks Next

The second trigger doesn’t need any conditions; since Storyline triggers are executed in order, it will only be reached if the first trigger isn’t activated. If all the links have been visited, the slide will change as soon as the first trigger evaluates to true, and the second trigger will never be evaluated.

For more Storyline tips and tricks, visit our website at: http://pathwaystrainingandelearning.com/.

Time-Saving Storyline Tips and Tricks

eLearning Development – Articulate Storyline Sliders

While not the most popular tool available in Articulate Storyline 2, one of my favourites is the slider.slider

My preferred use of this little widget is using it as way to dynamically deliver information, (usually manifesting as steps or a process flow).

toolbar

To find this tool, look under the Insert tab from the Ribbon > then choose Controls > then select the slider of your preference.

With your slider selected you can begin to setup your slider’s parameters. Once selected, the SLIDER TOOLS will appear in the ribbon and you can adjust the DESIGN and FORMAT settings as needed.

properties

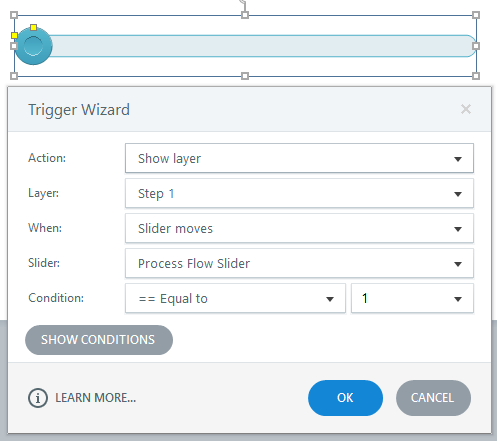
Now here is where things begin to get fun! Using the values that the slider inherently uses, we can set triggers to activate when the slider is equal to, less than, or greater than, any value we choose.

To setup a progress flow style function I set each ‘step’ to a separate layer and keep all content specific to each ‘step’ inside its own unique layer.

Below you can see the Trigger setup to take advantage of the slider, as it pertains to process flows & systematic steps.triggersettings

I hope you enjoyed hearing my techniques for implementing and using sliders, please feel free to leave a comment and share interesting way you might have found to use this interesting tool.

If you would like to learn more about eLearning development please visit www.pathwaysinc.ca


eLearning Development – Articulate Storyline Sliders