
One of the key factors to the success in your elearning is keeping your learners engaged. Making sure you have high quality, meaningful content is one of the easiest ways to keep learners fully engaged and motivated to learn. The idea is to stray away from offering general “nice-to-know” information that doesn’t bring any added value to the course. Stick to “need-to-know” information that will help learners improve a skill-set and overall knowledge. If you’re not sure what this key information is, figure out a way to find out what content your learner will find valuable and develop your learning strategy around that. If your learner feels like the information they are getting will directly help them in their role, you will find a higher level of engagement and commitment.
Learning
Time-Saving Storyline Tips and Tricks
Here’s a few of my favourite tips and tricks. Keep these in mind when you’re designing your next eLearning module, and they’ll definitely enhance your productivity!
Transitions
The Transitions panel at the top of the Storyline can be used to adjust the transition between any two screens. This obviously includes between slides, but it can also be used to transition between layers! This can be a great time-saver, if for example you’re using layers to overlay text or images on the base layer. Instead of applying an animation to each element in each layer, you can simply add a single transition to the entire layer. You can select “Apply to All” in the same panel to apply your transition to all layers in your slide.
“Format” dialog shortcut
This one is a beauty, and a real must-know for Storyline users. Select any object on your slide and hit Ctrl+Enter to bring up the Format dialog. This saves a ton of right-clicking!
“Size and Position” dialog shortcut
Hit Ctrl+Shift+Enter to bring up the “Size and Position” dialog. Another neat tip here is that Storyline will remember the last edited parameter, and will automatically bring the focus to the same spot when you re-open the dialog, which saves you even more clicking if you use this to your advantage.
New Textbox shortcut
Everyone knows that Ctrl+T gives you a new textbox, but did you know that you can set the textbox’s position on your slide before you create it? Simply left click on the slide where you want your textbox to be created, then hit Ctrl+T. The top-left of the textbox will be at the click point.
Take advantage of trigger order
This tip takes a little practice to get used to, and it varies for each situation, but it is generally more efficient to let your slide triggers work together, if possible, rather than duplicating functionality (and complexity) between them. For example I recently wanted to show a warning layer if the user tried to advance to the next slide without visiting all the required links. To do this, I let triggers fall through each other, so that I only had to actually program one of them. Here’s what my two triggers looked like:
- Jump to next slide when use clicks Next if … (all links visited)
- Show warning layer when user clicks Next
The second trigger doesn’t need any conditions; since Storyline triggers are executed in order, it will only be reached if the first trigger isn’t activated. If all the links have been visited, the slide will change as soon as the first trigger evaluates to true, and the second trigger will never be evaluated.
For more Storyline tips and tricks, visit our website at: http://pathwaystrainingandelearning.com/.
PROGRAMMING PRINCIPLES FOR STORYLINE DEVELOPMENT – PART I
The rise of graphical user interface-based programming software such as Storyline has simplified the creation of software and web content. No longer purely the domain of geeks, it is now possible to create a web application, for example, with no formal training, and no knowledge of a programming language.
This democratization of technology has led to a flood of creativity, as anyone with an idea and a little patience can turn it into a mobile or web-based application. Unfortunately, the focus on GUI-based WYSIWYG (What You See Is What You Get) editors has led to a loss of focus on the fundamental guiding principles of programming, which is in reality what we’re doing, whether it’s creating a Storyline eLearning program, or writing a Java-based Android app. I’d like to try to connect a few of the guiding principles of software development with some development patterns that you can follow when developing your own eLearning content. Today, we’ll discuss the DRY principle.
Don’t Repeat Yourself (DRY)
DRY is one of the fundamental principles of object-oriented programming. Even if you don’t have any idea what ‘objects’ are or why everyone’s so oriented on them, this is still a useful principle for your development. In a nutshell, DRY says that you should strive to develop so that if you need to change something down the road, you can change it in one spot, even if it is something that appears repeatedly in your program/eLearning module.
In Storyline terms, a good example of this would be using Slide Masters and Feedback Masters as much as possible. This usage can extend far beyond simply setting a background and header (although that’s not a bad start, if you aren’t doing this already). In another blog, I’ll write about how you can add repetitive elements like closed captioning and navigation controls in a Slide Master.
Another way you can reduce repetition in your eLearning module is to make triggers dependent on actual objects, whenever possible, rather than on timeline cues. For example, you want to sync an image’s motion path with the end of an audio clip. You could certainly set a cue point onto the timeline at the end of the audio clip, and then trigger the motion path based on that cue point… But what if you want to move the audio clip? You’ll not only have to adjust the clip, but also any cues that are positioned relative to it.
If you had simply triggered the motion path to begin when the timeline of the audio clip ended (or on ‘media complete’), you could move the audio clip as much as you like without breaking the timing of the motion path. Another way to put it is that your dependencies should be as limited as possible. In the original example, the path to starting your motion path went from Audio Finishes → Cue Point → Motion Path Triggered. When it’s spelled out like this, the cue point is clearly extraneous.
If you keep the DRY principle in mind when developing your eLearning content, you will save yourself all sorts of pain when it comes time to review and modify it. For more tips on developing eLearning content, or to see samples of our work, visit us at http://pathwaystrainingandelearning.com/.
Creating a Custom Hotspot Activity for eLearning using Flash
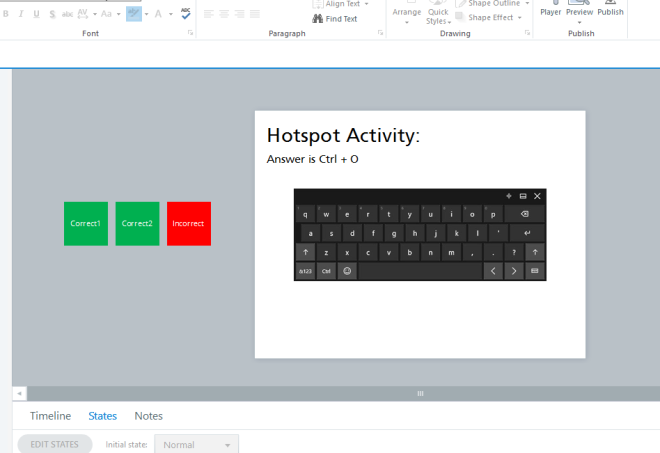
Here’s a quick look at how to create a cool Storyline-compatible hotspot interaction in Flash for an eLearning module. I recently wanted to make a pick-many activity where the user could select multiple keys on a keyboard. In Storyline, hotspot activities are weakened by the fact that only selectable objects have a hand cursor over them. I got around this by making a huge hotspot that covered the entire keyboard, and then putting the ‘correct’ hotspots on top of that one. This solved the hand problem, but made it impossible to have any hover/selected effects on individual keys. The user would have no idea which keys they had selected.
I know when to stop beating my head against a wall; Storyline just isn’t made for this type of complexity. This is a job for the Flash! The Adobe Flash, that is. I’m not going to go through the whole ActionScript3 code here, but I want to talk about the important part – the communication between Storyline, and the keyboard, which is a SWF movie.
For my purposes, I want the activity to be marked correct when the user has selected both ‘Ctrl’, and ‘O.’ The activity should be marked incorrect if any other buttons are marked as ‘selected’ when the user submits the interaction. To accomplish this, I placed three buttons off-screen, and assigned them to be the hotspot targets – two correct buttons, one each for ‘Ctrl’ and ‘O’, and one incorrect button, which gets selected whenever there are incorrect keys selected.
These buttons are triggered by Storyline variables (in this case, True/False variables named ‘correct1’, ‘correct2’, ‘incorrect’). There are triggers which change the state of these three buttons, based on the state of the associated variables. When the user hits ‘Submit’ the state of these three off-screen buttons is what determines if the interaction is marked correct or incorrect. Here’s an example of what the slide looks like in Storyline:
Okay, simple! So how do we adjust Storyline variables from a SWF movie? The answer can be found in this great article by Julio Ordonez. Here’s the short version, though. In your ActionScript3 code, call the following function to change a variable (in this case, we’re setting the variable ‘correct2’ to True):
ExternalInterface.call(‘GetPlayer().SetVar’,’correct2′, true);
The internal logic of deciding when to set each of your Storyline variables as True or False will be largely dependent on your particular circumstance. In my case, for example, I wanted my interaction to be marked correct only if two specific keys were selected, out of a possible 40 or so. I created an array to track all of the currently selected keys, and then iterated over the array on each mouse click, changing the Storyline variables depending on which keys in my SWF movie were selected.
The basic setup will remain largely unchanged, however. Simply hide your hotspots offscreen, and set their states via Storyline variable which are in turn set from within your Flash movie.
Here’s a working demo of the keyboard interaction.
USER EXPERIENCE
AN INTRODUCTION
User Experience (UX) refers to a person’s attitudes and emotions when using a particular product or service, which in this case is Web-Based Training. Sadly, the experience can be construed as somewhat neutral or even negative because the perception is that training means going through the motions. However, we constantly look for ways to break through that layer of perception and make something that inspires a more positive outlook.
HOW DO YOU SOLVE THAT?
In today’s world, the biggest challenge is finding a user experience that suits the content, but also delivers a positive experience. Many times, you’ll find that even if you’ve got a great and innovative approach to a set of material, the experience can appear to trivialize the subject. This is certainly an idea that most approach with caution. But why is this the case?
The landscape is the way it is because there are two players in the sandbox and each of them is looking for something different. One side is the group that wants to push for a more gamified experience, and the other is the set of people who are pushing more for the learning objectives to be clear and concise. A perfect example is how a client may want a course on, say, money laundering and a concept has been submitted for a game show look & feel. The receiving end of that concept may get it and view it as trivial, and come back with a strong reaction. The challenge is finding the solution, and establishing what the view is of the material and designing an experience around that versus viewing it from only one angle.
Once you have that holistic view, it’s much easier to develop a course that the end user feels does justice to the subject while also approaching it from a fresh angle. With this in mind, it’s possible to maintain the focus of your development efforts and concentrate on the end user, because ultimately they’re the best gauge for how well it works.
WRAPPING UP
If you would like to explore more about gamification, mobile learning and eLearning, take a peek at our company website: Pathways Training and eLearning, at http://www.pathwaystrainingandelearning.com/. We always look for fresh ways to engage learners and to make the learning experience as fun as possible!
MEANINGFUL GAMIFIED ELEARNING
AN INTRODUCTION
When people are building eLearning programs, a lot of the focus is placed on having the user take something away from the experience. However, many people don’t realize that games offer a lot of takeaways as well, which aren’t exactly the same, but have become fixtures. So much so that doing anything different means the game isn’t intuitive, and the new ideas need to be explained. The challenge is really finding where these two ideas meet and offering something that hits both the eLearning and gaming ideals.
WHAT ARE THESE TAKEAWAYS?
What I mean by games having takeaways is mainly in the controls. Every type of game in our minds has that certain set of familiar keys (for example, W, A, S, D) we use that are the standard for how we interact with the material on screen. The same goes for eLearning in the sense that we’re expecting to be able to the exact same things with our controls, like Play, Stop, Next Screen, Previous Screen, and volume. Any breaks in those conventions means we need to explain how everything works. Immediately in that small detail ,is a takeaway.
In the grander scheme of things, however, we’re dealing with games that are becoming more sophisticated in their overall quality. There are deeper stories, larger worlds, and generally more immersive experiences. All things that could benefit an eLearning program that uses a simulation, which I talked briefly about in my article on virtual reality. There’s also another aspect to the issue, which is generational.
We have a group of people in eLearning who grew up in a time where games and learning were two very different worlds and they have problems combining the two ideas. To them it means you’re developing one thing or another because a lesson can’t be conveyed. Completely untrue! A game can teach you a lot without you noticing, and still make the experience enjoyable.
HOW CAN WE COMBINE THESE IDEAS?
We’re always looking for ways to keep the enjoyment of pure gaming, but also use that idea to help the user learn more detailed things in an eLearning program. The main one of which is via simulation. It offers an environment where the user can be immersed in the activity and get an idea of what to expect when the learning comes more from practice. It’s also something that already exists, because there are simulators for driving and fight simulators, therefore this idea is easy to grasp.
WRAPPING UP
If you would like to explore more about gamification, mobile learning and eLearning, take a peek at our company website: Pathways Training and eLearning, at http://www.pathwaystrainingandelearning.com/. We always look for fresh ways to engage learners and to make the learning experience as fun as possible!
Programming tips: Modifying Storyline eLearning modules’ variables from Adobe Flash
As part of our series of tutorials, regarding extended functionality in Storyline by using Javascript and/or assets created in external tools, I want to jump in to a more advanced topic that will ultimately take our eLearning modules to the next level.
Let’s say you created in Adobe Flash a very fancy navigation bar with play, next slide and previous slide buttons, with some beautiful animations and states for the buttons that could hardly be done directly in Storyline, and now you are wondering how you will be able to actually control the module with that externally developed asset.
One option, and probably the simplest, is to import the flash object into your Storyline project and then cover the clickable areas with hotspots. While effective, because they will easily trigger the actions you want, this hotspots will also interfere with the states of your buttons, like the hover and clicked states. This happens because your hotspots are basically covering your Flash object and, in consequence, this object is not receiving any mouse inputs.
Another option is to have variables in Storyline that, modified by the Flash object, will drive the eLearning module, pausing and resuming the timeline, and going to the next or previous slide. In this tutorial, I want to show you how to achieve this by only using 2 variables in Storyline, that way we can also explore a bit more about triggers on the slides.
Just a heads up, since we will be using ActionScript 3 in Flash, we will have to do a bit more with coding compared to the first 2 tutorials.
Setting up the environment in Storyline
Let’s start by setting up the environment within Storyline, that way when we jump to coding in Flash, we will already know what to modify in our eLearning module.
The first step is to create 2 variables in Storyline that, as I mentioned before, will affect our module, pausing it or resuming it, and making it navigate to different slides. This variables could be as follows:
- pauseModule: This variable is a Boolean or True/False and its default value is set to False.
- navigateTo: This variable is Text variable and it’s default value is set to blank.
The second step is to create the triggers on the slide that will actually affect it. This triggers could be as follows:
- The first trigger should pause the timeline when ‘pauseModule’ changes to True.
- The second trigger should resume the timeline when ‘pauseModule’ changes to False.
- The third trigger should make the module jump to the next slide if ‘navigateTo’ changes to the value “next”.
- The fourth trigger should make the module jump to the previous slide if ‘navigateTo’ changes to the value “prev”.
- The fifth trigger should reset the value of ‘navigateTo’ to blank when the timeline of the slide starts.
Note: On the third and fourth triggers, the comparison to the values “next” and “prev” shouldn’t be case sensitive, that way we can ensure that inputs like “Next” or “PREV” have the same effect on the module.
Extending a bit further our work in Storyline, we can easily create a Master slide and implement this triggers in there, that way we don’t have to repeat this process n-times throughout our module.
Controlling our eLearning module with AS3
Now that we have set our variables and triggers in Storyline, it is time to go to Flash and create the code that will activate those triggers.
Let’s assume we have created 3 buttons and they are as follows:
- A play/pause button called ‘playPauseBtn’
- A next button called ‘nextBtn’
- A previous button called ‘prevBtn’
With that in mind, let’s create our code in AS3. In this part, I will explain each line of code so that we all have a clear understanding of what they do.
The first step is to import the libraries related to the events of the mouse (e.g. Click event) and related to the communication of our Flash object with Storyline.
import flash.events.MouseEvent;
import flash.external.ExternalInterface;
The ExternalInterface library will allow us to call Javascript functions that are external to our Flash object, and the MouseEvent library, will capture the mouse input on our buttons.
var playPause:Boolean = false;
var navigateTo:String = “”;
In the lines of code above we are defining the same two variables we defined in Storyline, the ‘playPause’ variable relates to the ‘pauseModule’ variable and will indicate whether to play or pause the timeline of our eLearning module; the ‘navigateTo’ variable will determine if the module has to navigate to the next or previous slide from the current slide. These variables will be modified by the functions linked to the following event listeners:
playPauseBtn.addEventListener(MouseEvent.CLICK, controlTimeline);
nextBtn.addEventListener(MouseEvent.CLICK, navigateNext);
prevBtn.addEventListener(MouseEvent.CLICK, navigatePrev);
In essence, an event listener, is a function that will be executed when an event happens, in this case, the controlTimeline function will be executed when the playPauseBtn is clicked, and the navigateNext and navigatePrev functions will be executed when the next or previous buttons are clicked, respectively.
Now let’s see how these 3 functions are defined, starting with the controlTimeline function:
function controlTimeline(evt:MouseEvent):void{
playPause = !playPause;
ExternalInterface.call(“GetPlayer.SetVar”, “pauseModule”, playPause);
}
We will take a more in-depth look at the structure of AS3 in a future tutorial, in the meantime, let’s understand what the previous function is doing.
Basically, what the contolTimeline function does is to toggle the value of the variable playPause between True and False, as explained on a previous tutorial (link to the first programming tips article), and then it executes our beloved Javascript function “SetVar” (please refer to the first programming tips article for a better understanding of this function) by passing the two necessary parameters.
function navigateNext(evt:MouseEvent):void{
navigateTo = “next”;
ExternalInterface.call(“GetPlayer.SetVar”, “navigateTo”, navigateTo);
}
function navigatePrev(evt:MouseEvent):void{
navigateTo = “prev”;
ExternalInterface.call(“GetPlayer.SetVar”, “navigateTo”, navigateTo);
}
And finally, the previous functions will indicate the eLearning module to navigate forward or backwards by changing the value of the variable ‘navigateTo’ to “next” or “prev”.
Before finishing the tutorial, let’s remember that this interaction can’t be tested locally within storyline and, as indicated on the first programming tips tutorial, we would need to make use of other tools to verify if our customized code is working.
If you want to know more about Javascript and ActionsScript 3 applied to eLearning or about how to use other tools, such as software for 2D or 3D animation to enrich the outcome of your products, don’t forget to visit our blog or our website at www.pathwaystrainingandelearning.ca.
Programming tips: Accessing LMS functions using the Javascript API in Storyline for eLearning modules
Continuing with the programming tips we started in the previous post, regarding how to write code in Storyline for eLearning modules, let’s continue this time with a little bit more of an advanced coding.
To summarize, we now know that our eLearning modules, when published from Storyline, come with a set of Javascript libraries that allows assets developed in external tools (e.g. Adobe Flash) to communicate with our modules and modify variables.
We also know about the reporting capabilities Storyline has, meaning that all the quiz questions you create in the modules, have the option to be graded and then reported to the LMS.
However, learning may not be as simple as creating slide questions with multiple answer questions, drag and drops or matching sequences, and sometimes we are required to develop this interactions somewhere else, so what happens when you want those interactions to be part of your eLearning module’s grade?
Well, thankfully we are able to manually report that score to our LMS, using Storyline’s Javascript functionality.
Storing the activities’ points and converting it to a percentage
Let’s say we have developed 6 interactivities in Adobe Flash and all of them send a point value to Storyline after they have been completed by the learner (This will be covered in another tutorial). To store this value in Storyline, let’s create 6 Number variables as follows:
- Activity1
- Activity2
- Activity3
- Activity4
- Activity5
- Activity6
And set all of them to a default value of 0.
Now, after all the slides with the activities, let’s create another slide that will work as our results slide, calculating the percentage achieved by the learner on the previous activities. On this slide, we can use a Javascript code that looks something similar to this:
var player = GetPlayer();
var act1 = player.GetVar(“Activity1”);
var act2 = player.GetVar(“Activity2”);
var act3 = player.GetVar(“Activity3”);
var act4 = player.GetVar(“Activity4”);
var act5 = player.GetVar(“Activity5”);
var act6 = player.GetVar(“Activity6”);
var scoreTotal = act1 + act2 + act3 + act4 + act5 + act6;
var percentage = scoreTotal * 100 /60;
Looks a little bit complicated? Well, let me explain it.
On the first 7 lines of code, we first get the Javascript API from the player and then get and store all the six variables containing the values reported by the activities. Then we have the following line of code:
var scoreTotal = act1 + act2 + act3 + act4 + act5 + act6;
In this line, we are only finding the total achieved by the learner after going through all the 6 interactions. Finally, we see this:
var percentage = scoreTotal * 100 /60;
This is just a simple ratio that allows us to translate the achieved points by the learner into a percentage. Let’s assume we have only 6 of these interactions and each one of them awards the learner 10 points if completed correctly, thus the value of 60.
If we do the math, let’s say the learner scored a total of 40 points, then percentage will be 66.7% (rounding up to the nearest decimal).
Reporting the score to the LMS
Now that we have the percentage we want to report, we can now report it to our LMS. Thankfully, Storyline allows us to communicate manually by providing a set of functions that we can use to report score or completion.
We achieve that by adding the following lines of code after calculating the percentage:
var lmsAPI = parent;
lmsAPI.SetScore(percentage, 100, 0);
What the previous 2 lines of code do, is that first, we get the LMS API provided by Storyline, and then we use the “SetScore” function to report the percentage to our LMS. If you notice, this function takes 3 parameters:
- The first value is the percentage achieved by the learner
- The second value is the maximum score that can be reported, 100 in this case, because we are talking about percentages
- And the third value is the minimum score that can be reported, 0 in this case.
After adding this Javascript code to your project, you can now rest assured that your elearning module will report a score, even if those values don’t come directly from Storyline, but they come from activities or interactions you developed in an external tool.
If you want to know more about Javascript applied to eLearning or about how to use other tools, such as software for 2D or 3D animation to enrich the outcome of your products, don’t forget to visit our blog or our website at www.pathwaystrainingandelearning.ca.
Traits of an Effective Project Manager

Project managers are tasked with leading diverse groups of individuals on the path to successfully completing a project. Depending on project size and scope, the task of the PM can be quite complex. In essence, the role of a PM can be deconstructed into multiple roles that include initiation, planning, design, execution, monitoring, controlling and closure of a project. As a result, project managers often have a particular combination of skills that enable them to be successful in the coordination of the projects they oversee. Below are some common traits of an effective project manager.
Excellent Communication Skills
It is imperative at the start of any project to clearly communicate project goals and expectations to all parties involved in the project. Effective PM’s are able to manage member feedback while ensuring that although all feedback may be taken into consideration, only suggestions which enable the project to move forward are put into practice.
Effective Team Building Skills
A successful project manager has the ability to inspire the team to work towards the end goal of the project. Ensuring that all members’ opinions are valued helps to create an environment where the vision of the project can be shared and where members truly feel that they have an equal role in achieving the desired outcome.
Mitigate Risk and Manage Problems
Being able to predict and create solutions to issues before they arise, increases the likelihood of an on-time and fruitful project. Preparing for worse case scenarios can prove to be an advantage even if things go as planned. If problems do arise, having a manager who calmly and collectively is able to manage issues serves to increase member trust and keep the team on task.
To learn about Project Management training and resources available at Pathways, please visit our website at www.Pathwaysinc.ca
Tips for Creating an Effective Infographic
Infographics are becoming an increasingly popular means of relaying information within the adult learning sphere. It allows for the simplification of complex and detailed information into manageable chunks which learners can easily digest. For the visual learner it can be a dream because of its graphical nature.
However although infographics they can really add to learning, not all are made the same. Below you will find some tips on best practices to creating an effective infographic that will truly stand out!
- Gather relevant data. Data will be easier to collect for some topics than it will for others. That being said, don’t fall into the trap of gathering useless data. Remember, the purpose of the infographic is to present material in a concise manner and to tell a story. Having statistics or interesting facts about your topic can serve to draw the learner in.
- Decide how you would like to display your information. Depending on the topic and data you have collected, there are ways of most effectively displaying information. For instance, for comparison’s side by side charts work well, and for percentages pie charts and bar graphs can be efficacious.
- Choose graphical elements that work. Being guided by the topic and content of the infographic, try to choose images that amplify the point that you are aiming to get across. Shy away from filler graphics and pay attention to the colours of images to ensure that they all flow in the overall finished product.
4. Add content to guide the learner. It’s great to include charts and images but what good is it without context. At the beginning and end be sure to include a short introduction and conclusion.
Here is an example of a good infographic with all of these elements, that we recently created.

To learn about training and eLearning resources available at Pathways, please visit our website at www.Pathwaysinc.ca
