TIPS FOR CREATING 3D GRAPHICS WITHIN ELEARNING GAMES

3DSTUDIO MAX – UI Selection Lock vs. Show End Result

3dStudio Max is easily my software of choice when it comes to creating 3D models. It’s not perfect, but for me it provides a diverse toolset when it comes to the modelling and texturing phases of the pipeline.

UI Selection Lock: allows for the user to select an object on screen and regardless of clicking on grey space, or other assets. Quite u
seful when it comes to navigating through dense scenes.

Show End Result: allows the user to toggle between the effects of modifiers placed on a mesh and the root mesh itself. Ex (previewi

ng symmetry while only modelling ½ of the model).

Both of these tools have buttons on the User Interface the UI Selection lock is located on the bottom to the left of the XYZ coordinate information.lock selection


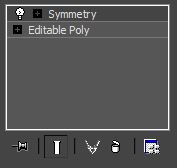
The Show End Result button is located underneath the modifier stack.

show end result

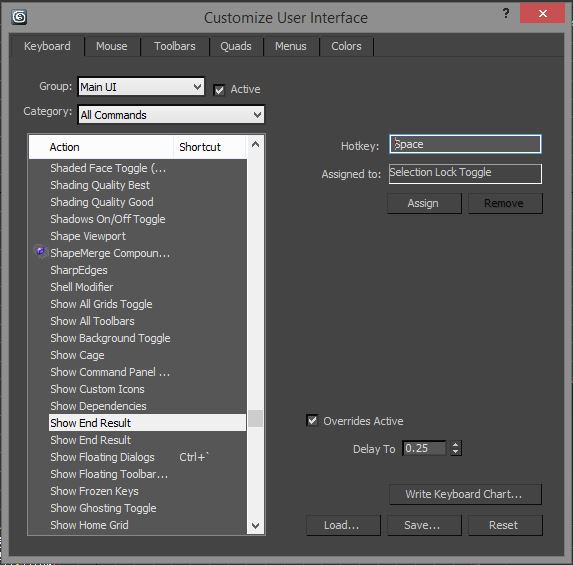
While both of these tools have their merits, 3dsMax (I’m using the 2013 edition) by default sets a shortcut to the space bar to UI Selection Lock.  However as a modeller I find it extremely useful to change the assignment of the space bar to the Show End Result.


To change shortcuts in 3dsMax is as follows. From the main menu, choose Customize> Customize User Interface. Under the Keyboard tab, the following menu will allow you to search for existing actions, or hotkeys and change them to your preference.  In my case I want to change the space bar to Show End Result, as it allows for a more dynamic modelling workflow.

customize UIRegardless which you prefer you can use this menu to customize Mouse clicks, mouse control, various toolbars and menus too.

TIPS FOR CREATING 3D GRAPHICS WITHIN ELEARNING GAMES

Project Management – Common Communication Problems and Solutions

communication-300x225

The success of projects, regardless of scope relies heavily on effective communication channels among all parties involved. With divergent opinions, interests and ideas at play, it is not difficult to envision why communication clashes can routinely occur.

Below you will find some common communication issues that may arise on projects as well as proven techniques on how to remedy them.

  1. Assumptions – Forming negative assumptions can often lead to unnecessary conflict between parties. Taking the time to understand others’ perspectives, and their role within a project can assist with ensuring that knowledge transfer is a smooth process. It is believed that effective communicators clarify assumptions to avoid conflict.
  2. Lack of Clarity – Although information may be clear to us, it is important to remember that others may not have the correct context and information necessary to fully understand what is being communicated. Breaking ideas and processes down so that others may understand can truly help to improve communication with project members.
  3. Not Actively Listening – Active listening is a skill which if honed can increase one’s ability to understand and be understood. Work on improving active listening skills and being cognizant of your own body language as well as the body language of others can go a long way to improving your own communication skills.
  4. Dictation – Dictation essentially refers to the act of giving orders without listening to the concerns of other parties. Including other team members in decision making will lead to more engaged members who have a vested interest in the project.
  5. Problem Mismatch- Parties involved may not be on par with the problem at hand. Attempt to separate and specify what actual problems are in situations where parties are not on the same page.
  6. Personal attacks- Issues sometimes arise where the discussion is taken away from the issue and made personal. Separate issues from people – making issues personal serve only to create a toxic environment.
  7. Derision – Individuals may be less likely to share their thoughts in a non-inviting environment. Encourage an open atmosphere where project members feel at ease to share their views.

To learn about Project Management training and resources available at Pathways, please visit our website at www.Pathwaysinc.ca

Project Management – Common Communication Problems and Solutions

Tips for creating 3D graphics within eLearning Games

3dStudio Max – Freeform Tools

The inclusion of high quality 3D art in eLearning games truly serves to elevate the overall aesthetic of the finished product. A tool which I find particular useful when developing assets is 3dStudio Max. Within this program, some features which I have found to be highly beneficial are the Freeform Tools. Personally, these tools have increased the efficacy of my workflow and thus better help me to create the target art outlined by the art direction.

Among my favourite 3DS Max tools are the 3 primary tools under the Freeform tab.

FreeformSlide

Upon selecting a tool you need to define a surface that the tool will work on. This surface can be the XYZ grid, or a specified mesh.  For this example the selected surface will be the XYZ grid.

Selecting a tool will allow you to execute several modelling functions simultaneously by holding ctrl, & alt, & shift in various combinations.xyz grid

Below you will see the subject, a simple box mesh that we
will use to test the Freeform Tools, and as mentioned above, the selected surface will be the XYZ grid.

box base

Step Build

The Step Build tool will allow you to click on a selected surface and place vertices freely, independent of existing mesh geometry.

STEPBUILD1

Holding the Shift Key will create polygon around the 4 nearest placed vertices. Holding the Alt Key will delete a vertex, and Alt+Ctrl will delete an edge.

STEPBUILD2

Extend

The extend tool allows quick manipulation of open edged geometry.  Looking at the plane we created before holding the Shift Key will allow you to quickly extrude edges based on the selected surface.

Holding Shift+Ctrl+Alt will allow you to reposition vertices based on the selected surface.

extend

Optimize

While using the Optimize tools, and holding the shift key, dragging one vertex to another will allow you to quickly merge vertices and ‘clean up’ your mesh.

optimize

Holding Shift+Ctrl, or Shift +Alt, will allow you to instantly remove and edge loop, or an edge ring.

These are among my favourite tools to use when creating 3D models for games using 3Dstudio Max. I find these tools especially useful for the process of retopologizing a model. In which the original model would be the selected surface and we could use these tools to create new geometry for the desired model.

I hope you enjoyed this short blurb 3D Tools. If you would like to learn more about gamification, eLearning, or on how gaming can be applied to learning visit: www.pathwaysinc.ca


Tips for creating 3D graphics within eLearning Games

VIDEO PRODUCTION FOR ELEARNING

Video production can be used to great effect to improve the quality of eLearning. On its own or as a part of an eLearning module, a video can add not only interest but also visual information that would be difficult or lengthy to describe otherwise. Video courses are extremely popular on sites such as lynda.com, and video tutorials on virtually any subject are available via YouTube.

There are many ways to make a video for eLearning. Perhaps the simplest is to share the screen of the instructor, accompanied by his or her narration. Many kinds of software can accomplish this, from Camtasia Studio to OBS (Open Broadcaster Software). This can often be accompanied by a webcam video of the instructor, or by some special effects. Useful effects include a highlight around the mouse cursor so that the viewer can follow it easily, or an effect indicating when the mouse is clicked. Sharing a screen can be a useful resource for teaching the viewers how to use new software.

Other kinds of video production involve using a camera to record video. Examples of such include in-studio production, on-location production, and green screen (or blue screen) production. Let’s examine each and see how they can be used to apply to eLearning.

In-studio production has the benefit of being shot in a controlled environment. Regardless of weather and time of day, the lighting inside the studio can be set up to suit the needs of the production. Some productions, such as cooking shows, even have a live audience. There are a variety of formats for in-studio productions, from talk shows to magazine format. In-studio productions are a great way to interview experts or to demonstrate a process relevant to the material. In-studio productions are ideal because they take place in a controlled environment, have access to electric outlets, lighting and equipment, and are flexible regarding what time of day you record the production.

On-location productions require the most preparation. Often, you will be filming at a location which doesn’t offer access to electric outlets. You may need to acquire a permit, and only be allowed to film on a certain date and at certain times. You may be at the mercy of weather, limited by daylight, and susceptible to a multitude of factors beyond your control. However, on-location productions produce the most compelling and interesting visuals which cannot be matched in-studio. For example, if you are filming a subject that’s geographic or historic in nature, there’s nothing better than to actually be there.

Green screening (or blue screening) is a method used to replace the background with any image or video that you want through a process called chroma keying. This allows you to film as if you were on location elsewhere. The benefit is the freedom of choosing any location – real of fantasy – that you want to show. You don’t have to travel there, and the production takes place in a studio controlled environment. It can be cost saving as well as interesting, but often very difficult to pass of as real. The post production may be difficult, especially if the lighting wasn’t perfect or if the videographer(s) have little experience with chroma keying. Even if it’s done well, it’s very difficult to compare to actual on-location video.

There are many ways to film a production, and many choices of equipment to make it happen. I will not discuss cameras or recommend specific equipment, but I do want to leave you with a few pointers to help you improve the quality of your production:

  • Have a good script! Make sure you know what you want to teach, focus on what is important, and present it in a way that will engage the audience.
  • Good lighting can make the greatest difference between a mediocre and an excellent video production.
  • Use a tripod and a fluid head, or other gear – such as a glidecam or steadycam – to make sure your shots are smooth and solid. Unless scripted or absolutely necessary, avoid hand-held camera shots.
  • Pay attention to your framing, and follow the rule of the thirds. Google it if you don’t know what it is. Find interesting angles and ways to show the picture. Every frame of your video should be beautifully framed.
  • Know your equipment, make sure you know how to adjust your camera’s white balance, monitor zebra striping for exposure, VU levels for sound. Always use headphones and pay attention to background noise or hum. Mic your talent, never expect good sound from the on-board microphone.
  • Test your equipment before each production. Make sure you have charged batteries, extra cables, gaffing tape, and anything else you may need.
  • Scout your locations if you will film on-location. Know what to expect when you get there.
  • Log your shots, for both audio and video. Make sure all shots for the day are checked off before you finish. If possible, shoot multiple angles to give you choices in editing.
  • Be pleasant and prepared. Don’t extend the production times beyond reasonable limits, it has a detrimental effect on the cast and crew, and it gives them the impression that you are poorly organized or ill-prepared. Be nice to the cast and crew, and they will be happy to help you!

If you haven’t already done so, I encourage you to produce even a short video on a topic of your choice. It can be a lot of work, and usually turns out to be more complicated than you had originally anticipated, but the result will undoubtedly be worth it! As the saying goes, “A picture is worth a thousand words.”, so I say that “A video is worth a thousand pictures.” Happy producing!

If you would like to learn more about how videography can be used in eLearning, or to see how our company approaches eLearning in a new and innovative ways, please visit our website:

http://www.pathwaystrainingandelearning.com/

We specialize in bringing eLearning to the next generation through a variety of highly effective means, from traditional classroom training to videos, eLearning and eGaming designed to maximize learning effectiveness and material retention.

VIDEO PRODUCTION FOR ELEARNING

The ABCs of Clear Learning Objectives

Learning objectives are statements that describe specific and measurable things that the learner is expected to be able to do when they have completed an elearning course, which also indicates how this is being measured. These are different from learning goals, which combine the content with the learning objectives to describe what the learner should be able to do with the knowledge they have acquired.

When writing your learning objectives, consider these things:

  • Audience: plan for who your learners are.
  • Behavior: describe what they will be able to do
  • Conditions and Degree: how will the learner’s performance be measured, in what conditions and to what degree.


Here are some other resources which provide good information about learning objectives.

‘Writing Learning Objectives’ About eLearning, Nov 10, 2010. http://www.about-elearning.com/learning-objectives.html

For more about Learning objectives, check out these articles:

What are Learning Objectives?

Writing Learning Objectives For eLearning: What eLearning Professionals Should Know

We offer courses on how to create effective learning objectives and instructional design for classroom and eLearning courses. For more information, contact us at 1-888-961-6011 or check us out at www.pathwaystrainingandelearning.ca

The ABCs of Clear Learning Objectives

Common Project Management Problems and Solutions

Signpost pointing to problems and solutions.

Regardless of one’s role within an organization, it is not uncommon to be involved in multiple projects at a time. Because projects can differ in complexity, scope and in its demands, understandably problems can arise along the project cycle. Knowing how to deal with these issues at the onset, is a great strategy to maintain momentum on achieving project goals within the assigned timelines. Below you will find a list of project management problems that commonly occur, as well as some tips on how to tackle them.

Assigning the wrong person to manage the project

Before a project begins, a Project Manager will be tasked with the job of managing the goals and expectations of the project. The person who occupies this role will be accountable for ensuring the overall success of the project. Thus, it is important to consider someone whose skill set corresponds with the requirements of the project.

Insufficient buy-in from project members

If project members are not on board with the project requirements, the rate of overall success inevitably declines. To increase buy-in from project members it is imperative that reasons for, benefits and risks of the project are clearly communicated. As well, when people have a clear understanding of their roles within the larger picture, they are more likely to want to actively participate in the process. Facilitate communication channels with project members at all steps of the project. Set up regular meetings; they can be effective to keep the project on track. Encourage project members to voice any concerns or potential issues ahead of scheduled meetings.

Taking on multiple projects at the same time

Everything cannot be done at the same time and some tasks will almost always have to take priority over others. The same rule applies to projects. If there are one or two major projects for which you require some of the same project members, be cognizant of their capacity and the roles that they play within various projects. Overloading members with tasks can lead to work that is of sub-par quality. As well members may become disengaged from the project which works against the buy-in principle.

Not being specific with the scope of the project

Too much or too little flexibility can negatively affect the realization of a project. As much as possible, define the scope of your project from the outset and monitor the project regularly to make sure your team is within the scope.

Not having a clear standard for defining success

From the inception of a project it is important to clearly define the expected end goals. Outlining expectations will assist with setting up timelines and with the general planning around resources. For the project manager as well as members, having a well outlined plan truly makes the execution process on projects flow smoothly.

To learn about Project Management training and resources available at Pathways, please visit our website at www.Pathwaysinc.ca

Common Project Management Problems and Solutions

Creating Animated Elements

Previously I wrote about why it’s beneficial to include animated elements in eLearning and training modules. This time I would like to delve deeper into the process of how this is done.

Even if you are a novice to 3D animation, spending a few hours on useful tutorials will get you up and running in your 3D software of choice. You will be able to create elegant, impressive assets to use in eLearning modules, websites or videos. You will be able to make animated buttons or icons with glow or light effects, or amazing, photographic reflections. All it takes is a little bit of effort and a few hours of learning how to use a 3D animation software. The rewards are endless possibilities of custom additions to your eLearning modules, websites and videos!

My choice of 3D software is Autodesk Maya, however you can just as well use 3D Studio Max, LightWave 3D, Houdini, or the free open source 3D animation software Blender. Depending on your tool of choice, the details of how you create and animate your 3D assets may differ but the general workflow remains the same. Today I will talk about how to create a spinning “QUIZ” token, as in the image sequence below:

Quiz_Rotation

In Maya, I created a sphere and squished it. I set the material of the sphere to “Glass, Solid”. I created two rings out of cylinders, and shaped them to conform to the surface of the sphere. I created some grooves in the rings for interest, and assigned a polished metal material to them. I created the word “QUIZ”, extruded it slightly and using the bend modifier, I wrapped it neatly onto the surface of the glass sphere. I assigned the same polished metal material to it. Finally, I copied the glass sphere and squished it even further, making it almost completely flat. I positioned it inside the glass sphere, and chose a green metallic paint material for it.

I grouped all of these objects together, so that I can rotate them as one object. I animated a slow rotation of 180 degrees over a period of 96 frames. (At 24 frames per second, this works out to be a 180 degree rotation in 4 seconds.) Finally, I added an HDRI reflection to the scene, which reflects beautifully on the glass surface. You can read about and download free HDRI reflection maps if you do a search online. Reflections really add the extra polish to your assets, making them look shiny and elegant.

I rendered the rotation in 96 frames as a sequence of images. I prefer to use the .PNG format, because it retains quality and allows my background to be transparent.

Next, I imported the sequence of images into Flash, where I distributed them to keyframes in the timeline. Flash can do this automatically for you. For specifics on how to do this, or any other procedure I described here, please do a search online. All the information is out there and accessible, if you only take the time to search.

If you want your animation to loop continuously, you are done! All you need to do is create the .SWF movie in Flash, and it will loop continuously. If you want the animation to only loop once (or twice, three times…) then you have to create a keyframe on a new layer, at the point where you want the animation to stop. On this keyframe, open the Actions window, and type the script:

stop();

This command will tell Flash to stop the playback at this point, and not loop the animation continuously. Now create the .SWF file – the shortcut on a PC is [CTRL]+[ENTER]. You are done! You have created an animated Flash movie from your image sequence, which you can now import into Articulate Storyline and use in your eLearning modules.

Depending on the format that you need, you can create a similar animation for use on a web page or for a video. You can easily change the text or colour of your animated element, you can add glow or change the lighting or materials. Try experimenting with different kinds of HDRI maps to see what effect different reflections have on the look and feel of your animation. There are many free HDRI maps on the internet, of both interior and outdoor scenes.

I hope this article inspired you to use 3D assets in your projects, and learn more about 3D animation software. For me, 3D animation has opened doors to creativity and I always love to incorporate it into my work.

If you would like to see more about how 3D and 2D animation, as well as whiteboard animation can be used to enhance eLearning, please visit our company website, Pathways Training and eLearning, at http://www.pathwaystrainingandelearning.ca/.

Creating Animated Elements

Programming tips: Writing code in Storyline for eLearning

There is always a time in our development phase where we need to add some extra fancy elements or interactions to our eLearning projects. Even though Storyline usually provides us with all the tools we need to produce our eLearning modules, sometimes it falls short on some of the things we want to do and then, we need to make use of other software, such as Adobe Flash.

However, and unfortunately for non-programming people, communication between those external tools and Storyline is not as straight forward as we would like it to be.

On the other hand, Storyline offers an API (Application Programming Interface) to help us while integrating interactions made on other software into our modules. This API consists of a group of Javascript functions that will let us retrieve and modify objects, usually Storyline variables.

I am aware that thinking about coding something in Javascript (or any other programming language) may be scary for some people, but I like to believe that regardless of the language, we can all code something, given that one of the most important things is logic, and as far as I am concerned, all human beings are logical, too.

In this article, I describe several tips that may help you use the Storyline API and even, introduce you to the coding world.

Avoid writing code whenever possible

As much as I love programming, I also love to avoid it when it is not necessary. It may sound contradictory, but before jumping into writing code and scratch your head for hours, make sure you have a legitimate reason to do it.

Usually, when you have to develop a module in Storyline, you have a reference, like a script or a storyboard describing all the interactions on screen (If you don’t have this, I strongly recommend you create a storyboard before developing a module), evaluate them and figure out if what you have to do is possible through the tools offered by Storyline.

There is a specific situation that I have experienced, in which I definitely use the Javascript API to enable my interaction, and this is, adding a button on the player to show a layer with closed captions when there is audio present.

Understanding the API

If you have decided to use Javascript on your project because you deem it necessary, or, well, because you want to try it, you need to understand how the API works, or at least have an overview of the things you can accomplish with it.

As I mentioned before, the API is a group of functions (provided by Storyline when you publish your module) that you can use to modify objects within the project, i.e variables. Yes, you can modify the value of variables using Javascript and (Spoiler alert) you can have triggers of actions happening when the value of those variables changes.

01

On the picture above, we can see a simplified version of how the API works. First, your Javascript code, will ask the API to retrieve the value of a specific variable from the Storyline module. Then, when that value becomes available to your code, you can modify it, changing its value to a different one or even making math operations if your variable is a number. Remember that Storyline works with 3 types of variables: Text, numbers and Booleans (true or false).

Once you have done everything you needed with that value, you can post or submit your results to the same or another variable that matches the type of your new value. To do that, you just ask the API to send that value to a specific variable within your Storyline module.

Creating the Javascript code

Now it’s time to actually write the Javascript code within Storyline to execute the desire actions.

Let’s say you have a layer that will show up when you click a button on the player (Like the resources button you can add). When you create this button on the player window, you have fewer options under the “Action” drop down menu as if you were creating an object directly on one slide. One of the options is to “Execute Javascript”. Once you create the action, you can edit the Javascript code linked to this button on a pop-up window that looks like a notepad.

The advantage of the API is that it is available right away when you create the action, meaning that you don’t have to “include” or “import” any programming libraries, like you would do with ActionScript 3 or C#, for example.

Let’s also say, that you have already setup a variable that will toggle the visibility of your layer, and it is called “myToggle” and it is a Boolean variable with a False value by default. The idea is that the layer becomes visible when myToggle changes to True and hides again when it changes to False (This is the logic you would use to create the triggers on the slide).

The first thing you have to do, is to make sure the variables are accessible from your Javascript code, and this is done by adding the following line of code:

var player = GetPlayer();

This line of code is simply creating a temporary variable that will retrieve and store all the functions that will help you modify variables within Storyline.

You can change a variable’s value by using the following line of code, if it’s a text:

player.SetVar(“myVariable”, “Lorem Ipsum”);

or if it’s a number:

player.SetVar(“myVariable”, 25);

The sintax of the “SetVar” function is very simple, the first parameter refers to the variable you created in Storyline and that you want to modify (This parameter should always be inside quotation marks), and the second parameter is the actual value you want to assign to that variable; if it is a text, the text should always be inside quotation marks, otherwise, if it’s a number or a Boolean, the quotation marks are discarded.

However, in the example we are following to create the Javascript code, we can’t really assign a value right away, since we first want to know if myToggle is true or false (if the layer is visible or not). To achieve this, we can use the following code to know the current value of myToggle:

var toggleValue = player.GetVar(“myToggle”);

The sintax of the “GetVar” function is even simpler than the “SetVar” function, it only needs one paremeter and it is the name of the variable you want to retrieve, always using quotation marks, and it is assigned to a temporary variable created in our Javascript code because, well, since we are retrieving a value, we need to store it somewhere.

Please note that this function, retrieves the value of the specified variable and not the variable itself, meaning that whatever we do with this value, doesn’t necessarily affect the variable within Storyline, unless we tell the API to do so (which is done with the “SetVar” function).

Now that we have the current value of myToggle, we can decide whether to change it to False or to True. We could use a conditional here, but in my experience it doesn’t work as well as the following code:

toggleValue = !toggleValue;

Wow, the previous line of code looks a bit scary, doesn’t it? Let me explain it (or a least try) so that it is clearer.

Since the value we just retrieved is a Boolean, meaning that we have either True or False, we can apply something called Boolean Operators, and in this case in particular, the exclamation mark preceding “toggleValue” is a negation of the value stored within that variable. This negation, simply changes the value between True or False depending on the current value, so if you say that something is NOT False, then it is true, and if something is NOT True, then it is false.

Looking at the line of code, without the name of the variable on the second half of the equation, and assuming that the current value is False, we would see something like this:

toggleValue = !False;

Which in common tongue, that line of code is read “toggleValue equals to NOT False”, so as a consequence, we are instructing Javascript to assign the value of True, because saying NOT False is the same as saying True.

With the line of code “toggleValue = !toggleValue;” we are ensuring that whatever the value we retrieved (true or false), it will always assign the contrary value.

Finally, after modifying the value, we need to send it back to Storyline and assign it the the “myToggle” variable. This can be done by using the function we reviewed earlier:

player.SetVar(“myToggle”, toggleValue);

The previous code is asking the API to assign the value stored in the variable “toggleValue”, to our variable in Storyline “myToggle”.

And with this, our layer should be showing up and hiding when we click on the button we added to the player.

Testing your interaction

Unfortunately, all the code we created on the previous section, is not available on preview within Storyline, because all the Javascript is blocked for security reasons.

In consequence, we have 2 different options (that I can think of) to test our customized Javascript code:

  1. We can actually publish our module and upload it either to our LMS or our webserver, that way it is possible to test our interaction live.
  2. Another option, if you don’t have a web server available nor a LMS, is to install a local server, like Xampp, and test it locally.

It could be a bit time consuming, but it is worth since the interactions created this way can improve the engagement of our modules.

I know using Javascript at first could be somewhat confusing or it could terrify you, if you are not used to code, but in the end it is rewarding to give it a shot when producing your eLearning modules.

Programming tips: Writing code in Storyline for eLearning

5 Articles to Help You Add Video to Your Elearning

With the technology available now for learners to interact with elearning, it gives developers a wider range of ways to develop content that is more impactful and engaging for their audience. A great way to do this is through adding video. Here are 5 articles for what you need to know to get started in producing video for your elearning.
Best Practices for using Video in elearning – A complete primer on the basics of what you need to know to produce video and considerations when putting it in elearning.
How to Effectively Use Video for Training – Tips for getting better results from your video content.
Video Security in Your Online Courses – A list of suggested resources for hosting and protecting your video content.
Why Video Is The Best Medium For Microlearning – Why video might be the best way to present microlearning.
Pros and Cons of Using Video in elearning – Things to consider when making the decision to put video in your elearning.

5 Articles to Help You Add Video to Your Elearning

Synchronous vs. Asynchronous Learning

Blog #11-Synchronous and Asynchronous Learning

Image