3 Tips for Creating Effective eLearning

eLearning can be a very successful training medium if executed well. The rollout of eLearning programs can save organizations on training costs, with the added benefit of faster delivery and the reach of a wider scope of employees.  Creating eLearning that is both effective and engaging however, can sometimes be challenging.

Here are three tips that are useful when working on eLearning projects.

 Learning Objectives

Having a clear idea of what your learning objectives are helps to shape the content of your course.  When writing objectives, be specific and focus on connecting these goals with what you want learners to take away at the end of the learning. By making objectives clear and concise, I find that I am better able to focus in on creating targeted evaluation pieces.

 The importance of great images

Images can truly help bring life to learning. That being said, not all images are created equal. When selecting images, try to include those which help to connect content to the real world. Learners tend to grasp information more easily when presented with a quality visual.

Also be mindful of including the right image size and provide the correct placement to match the content being presented.  Choosing images that really connect to the subject matter can help make concepts more relatable to learners.

 Create engaging learning

Because eLearning cannot necessarily cater to learners in the same manner as classroom training would, it is important to incorporate activities that are engaging and can keep learners interested in the subject matter. Since adults learn by doing and are most engaged when all senses are utilized, creating activities that appeal to multiple senses can be highly effective.

An example that uses a learner’s visual, auditory and kinaesthetic senses for instance can be a game. If done well, games can serve to positively affect the learner’s ability to understand and retain complex material. The advantage of activities such as these is that the content can seem less daunting and more fun, as learners are rewarded for their participation.


This list is not everything that is needed but provides a few key guidelines to consider when conceptualizing and designing eLearning. To learn more about the work that we do at Pathways please visit our website athttp://www.pathwaystrainingandelearning.ca/.

3 Tips for Creating Effective eLearning

Why (and how) you should incorporate badging into your eLearning strategy

1 Badge_Yellow.jpgRemember the participation badge you got for showing up to your grade 9 track and field competition? This isn’t that.

I’m talking about acknowledging the mastery of knowledge and skill sets to encourage iterative and deep learning. Done properly, badging can recognize the internally motivated among us.

But I don’t want to dismiss my (and your potential) initial resistance to badging because I believe it helps us better focus on the success criteria for valuable badges. Badging meets resistance because those of us who got participation badges considered them utterly worthless and we did so precisely because they were issued to anyone who managed to just show up for the race. To participants who trained for the day and genuinely competed, the badge was insulting and demotivating. Done hastily or half-heartedly, badges can discourage learning. To be effective, badges must:

  • Be issued selectively, probably on the basis of some pre-established criteria,
  • Be issued by a credible person or institution and
  • Be publishable (or displayable) in a place that is meaningful to the recipient.

Effective badging requires planning and preparation in both the design and build (development) phases of your eLearning project.

Designing badges

As any member of the scouting movement will tell you, participants are required to complete a tasks and then present evidence before being they are awarded merit badges. Badges in eLearning should mirror this structure. If you have established performance outcomes and rubrics (your learner success criteria), you’re on the road to badging.

However, if you only have a fuzzy idea of what the performance outcomes should be, then you need to invest more time in the planning and design phases of your project to establish these criteria before you are ready to leap into the world of badges. An eLearning vendor can help you identify performance outcomes and map them to a learning strategy so that your badges are relevant. Already have those success criteria defined? Beware of badging overkill. Don’t apply badging for mandatory content as it defeats the motivational purpose of badging and rapidly diminishes their stock.

For badges to be valuable to learners, they must have a compounding effect. A single badge tells something of a learner’s interests and skills, but an amalgam of badges tells a fuller, interwoven and altogether more interesting story about their interests and abilities. Its this prospect of telling the fuller story that motivates learners to seek out, accumulate and display badges for professional development. (More on displaying badges in the section below.) Done properly, badging should be integrated into your eLearning strategy.

Building badges

1 Badge_Blue.jpgAt their heart, badges are images with metadata; metadata are what distinguish a meaningless participation badge from a sought-after badge for professional development. Badge metadata contains information on the evidence of a learner’s concept mastery, the validity of the issuer, the duration of the badge’s validity and any other vital information the issuer wishes to communicate.

On the subject of the duration of a badge’s validity, setting time limits (or expiry dates) on badges makes perfect sense as most knowledge and skill sets require maintenance to remain current. Once expired, badges shouldn’t disappear. After all, the currency your skill and knowledge set is not the same as not having that skill or knowledge set. Your badge’s metadata will determine its credibility, so consider this issue with care.

Because badges need to be published in a place that is valuable to the learner, they must be platform agnostic. In other words, just as learners have the freedom to accumulate (or to elect to not accumulate) whatever badges they want in whichever order they choose, so too should they have the freedom to decide where and when to make those badges visible. If you’re delivering your learning via LMS, find out if your LMS supports badges and if they can be exported from your LMS to be published on other platforms such as LinkedIn.

Getting started

1 Badge_Red.jpgProperly planned for, designed and delivered, badging can support learning in the modern world by providing relevant, flexible, interesting and valuable methods of credentialing. So how do you get started? I firmly believe that experience is the key to relevant instructional design and development. You can’t design and build badges without first experimenting with them as a learner. Go out and earn some badges!

Why (and how) you should incorporate badging into your eLearning strategy

KNOW YOUR LEARNER

people crowd walking on street
If you’re unable to differentiate your learners from the crowd, you’re disconnected from them.

You have the performance objectives, you have a plan, you even have the content, but what do you actually know about your learner? What are you assuming you know? The clearer your view of the learner, the more relevant your learning solution will be and the more proactive you can be at anticipating learner needs and removing obstacles.

Here are some questions to help you get a handle on who your learner really is:

  • What is their motivation for learning? With compliance training, for example, learners are required to sit through learning. This yields expected results. Knowing what compels learners to take training will help sharpen the focus of that training and may point to obstacles to motivation which you can investigate and address.
  • What is their experience with learning? If your learners have been subject to hours of painfully boring eLearning, odds are they will avoid your course, no matter how masterfully designed. Similarly, if learners have had to sit through hours of disorganized in-class training, they’re unlikely to be eagerly awaiting your session, despite your ability to engage and inspire. Badly designed and executed learning is a reality that all learning professionals have to overcome. Our challenge is to find ways to secure and build on our learner’s trust.
  • Are they supported? On-the-job knowledge and skills transfer doesn’t magically happen; OTJ transfer must be designed, monitored and maintained. To change a workplace through learning, you must have a firm understanding of the OTJ transfer plan and how your solution fits within that plan.

What do I do with this information now?

If you are unable to differentiate your learner from the crowd, you are disconnected from them. As a result, you can only guess at their needs, motivations and the barriers they may be facing. This produces learning solutions that alienate learners and fail to meet organizational objectives. More than designing and delivering targeted and engaging learning solutions, we must identify barriers to learning and remove them when we can.

KNOW YOUR LEARNER

USER EXPERIENCE

AN INTRODUCTION

User Experience (UX) refers to a person’s attitudes and emotions when using a particular product or service, which in this case is Web-Based Training. Sadly, the experience can be construed as somewhat neutral or even negative because the perception is that training means going through the motions. However, we constantly look for ways to break through that layer of perception and make something that inspires a more positive outlook.

HOW DO YOU SOLVE THAT?

In today’s world, the biggest challenge is finding a user experience that suits the content, but also delivers a positive experience. Many times, you’ll find that even if you’ve got a great and innovative approach to a set of material, the experience can appear to trivialize the subject. This is certainly an idea that most approach with caution. But why is this the case?

The landscape is the way it is because there are two players in the sandbox and each of them is looking for something different. One side is the group that wants to push for a more gamified experience, and the other is the set of people who are pushing more for the learning objectives to be clear and concise. A perfect example is how a client may want a course on, say, money laundering and a concept has been submitted for a game show look & feel. The receiving end of that concept may get it and view it as trivial, and come back with a strong reaction. The challenge is finding the solution, and establishing what the view is of the material and designing an experience around that versus viewing it from only one angle.

Once you have that holistic view, it’s much easier to develop a course that the end user feels does justice to the subject while also approaching it from a fresh angle. With this in mind, it’s possible to maintain the focus of your development efforts and concentrate on the end user, because ultimately they’re the best gauge for how well it works.

WRAPPING UP

If you would like to explore more about gamification, mobile learning and eLearning, take a peek at our company website: Pathways Training and eLearning, at http://www.pathwaystrainingandelearning.com/. We always look for fresh ways to engage learners and to make the learning experience as fun as possible!

USER EXPERIENCE

It’s Just A Matter Of Perspective…

I’ve had the great pleasure of speaking to many audiences about the ‘phenomenon’ of generational dynamics. This is the term used to describe the distinctive attributes of one generation vs. another and (largely) how they are challenged to understand each other – particularly in the workplace.

Many people have weighed in on this topic – but few – in my experience, have attempted to understand what drives the ‘contempt’ that is often spewed at the generation known affectionately as Millennials. Instead, terms like lazy and entitled are thrown around as though they apply unilaterally. Of course, in the greatest of ironies, the people most apt to ‘label’ these twenty and early thirty-somethings, are the ones that ‘created’ them.

Yes, workplace Boomers – Generation Y are your offspring.

The truth is, there are far more cross-generational similarities, than there are differences. Sadly, most discussion about generational dynamics is at best stereotyping, and at worst, ageism.

So is there merit to this ‘dynamic’ at all? In a word, yes.

Experiences. Specifically, those significant socio-economic, political, environmental and/or cultural experiences each of us are exposed to. These are the foundations of the phenomenon. Why? Because, it is a generation’s exposure to these key events during their formative years that become the flagpoles for their views of the world – and ultimately – the drivers behind their opinions on how things ‘should be’.

For example, I feel safe in arguing that an individual’s perspective on life would have been shaped by living through an event as significant as the Great Depression. This would not preclude other events in that person’s life from impacting their perspective – but certainly the Great Depression would be among them. Perhaps that individual would have been less likely to use credit, choosing instead to pay cash. Perhaps they would have been more likely to have savings (under their matress) rather than trusting a financial institution etc.

If you apply this same principle to Millennials, you can begin to piece together how this demographic would view the the world around them – personally and professionally. Moreover, it begins to explain why an entire generation is often branded as ‘entitled’.

Let me explain.

Depending on your age, you will remember that failing in school was a distinct possibility if you performed poorly. Receiving a zero for not handing in an assignment was understood. ‘Repeating a grade’ because of poor performance was the ultimate consequence. But for Millennials, these concepts are largely foreign. This have never been their reality.

So what?

Well, if you are not familiar with the concept of social advancement, it simply refers to the position most school boards (at least in North America) hold regarding failing children. Instead, of ‘holding students back’ or having them repeat a grade for a second time, children are moved with their peer group, irrespective of academic success. This is for the betterment of their social advancement. Ideas such as receiving a zero, or an ‘F’ grade are largely a thing of the past. In some cases, even the use of red pen to indicate errors has been banned. This is all to insulate (a potentially impacted) child’s self-esteem from damage and ultimately to secure their long-term academic success. Students receive feedback that is designed to be constructive, not critical. All with an aim to drive improvement, without negatively influencing self worth.

It doesn’t matter what your perspective is on this notion, merely that the impression on those individuals with these experiences is very real.

But why would grade school, or high school matter to someone that’s in the workplace and now 25 years old?

Remember, you do not measure sociological impact in days and weeks, you measure in decades. If you’ve never been allowed to fail (or more importantly) there has always been a second chance, how might you be impacted when you interact with someone that has? Perhaps a manager or client, for whom ‘getting it right the first time’ is the only option. This is the ‘dynamic’ in action. This is today’s workplace.

In the example I’ve sited, an employee that failed to ‘get it right the first time’ would most certainly receive feedback. Every generation understands that. However, for those of a certain age, this feedback would be received (or presumed to be received) as their boss is handing them a ‘pink slip’. But for Millennials, (remember the experiences shaping their perspective) feedback is a thoughtful way to help them improve, to create a better ’employee’ moving forward. Certainly not a forerunner to their termination. Which employee might seem ‘entitled’?

Here’s another example.

When I look back on my youth, I cannot remember a time when I ever questioned a teacher. Their word was law. They were not my equal and they were certainly not to be challenged. My grade school principal was approximately 9 feet tall and 900lbs (or so). He too was not interested in my self-esteem. He was quite content never to speak to me – unless he needed to. If, ‘he needed to’, I was in trouble.

Today, teachers and administrators alike, have taken on the roles of school liaison and ambassador. Typically, they stroll warmly through the hallways, waving and smiling at their students. They encourage collaboration and welcome (respectful) disagreement of their opinions and decisions. Certainly not the figures of intimidation I remember. But if respect is ‘earned’ (today’s understanding) and not given (yesterday’s understanding) how might these views collide in the workplace?

Remember, ‘entitlement’ is a perception. Typically its arrived at through the lens of someone that doesn’t believe another has earned the right to have what they’ve asked for. So who decides? That’s the real problem. If a boss that ‘cannot be questioned’, engages with an employee that ‘has always been allowed to voice their opinion’, we experience a generational divide.

Honest communication is the only real answer. It almost always is when attempting to drive positive change. Open exchanges aimed at understanding  – rather than awkward meeting room glances, private gossip or social media driven tirades.

A Millennial is no more entitled, than a traditionalist (having grown up in the wake of the Great Depression) is cheap. It’s just a matter of perspective.


It’s Just A Matter Of Perspective…

Make a ‘Prezi’ Style Graphic for your eLearning Course, Part I

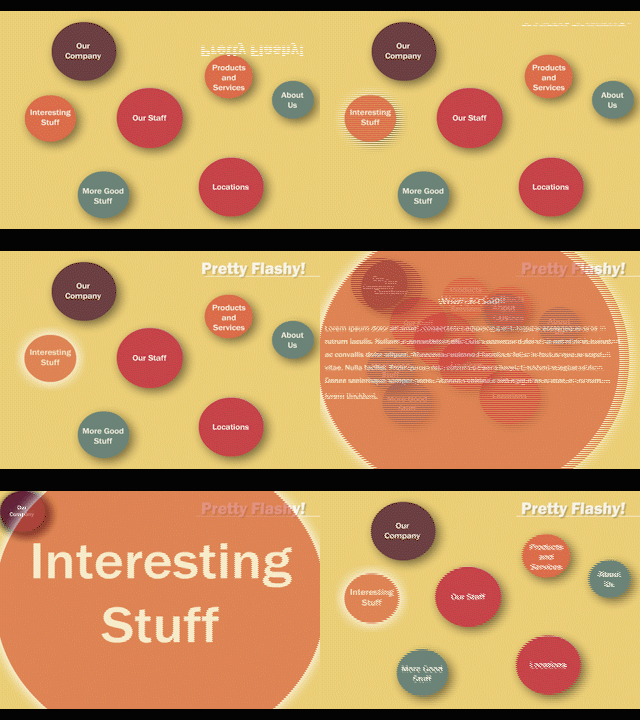
In this blog, I’d like to begin walking you through creating an interactive ‘Prezi’ style graphic in Flash Professional. This style of graphic can really spice up your eLearning content, and can be a great way to get a large quantity of text information to your learner in an engaging and interactive manner. It’s a bit of work to get set up, but once you’ve done it once, you can re-use the template in any eLearning course, and with minimal effort tweak and modify it to get all sorts of different looks and effects. Here’s a quick peek at what we’re going to be working towards.

dec_1_prezi_demo_1

As you can see, there are a three distinct elements to this interaction:

  1. The mouse-over effect: When learner passes the cursor over an item, it glows and increases slightly in size, creating a 3d look
  2. The motion effects: when the learner clicks on a bubble, it expands to fill the screen, while the others stack together in the corner
  3. The text change: as the bubble expands, the title is replaced by some eLearning content. When the user clicks the bubble again, it returns to its initial size and location, and the title again replaces the eLearning content.

There are a few ways to do something like this, but most of them are unbearably hacky and take like ten thousand keyframes, timeline labels and goToAndPlay() commands. My head is spinning just thinking about it. But we do not do hacky here, friends; there is a better path, and we shall follow it. That path involves a little bit of code, but nothing too crazy. And in the end, we’ll be left with an awesome eLearning graphic that has only one (yes one!) frame on the main timeline. Let’s get started.

Get a new ActionScript 3.0 document set up, and make some bubbles with the Oval Tool (O is the shortcut). Make them fun colours, maybe add some drop shadows. Then create some text centered in each bubble using the Text Tool (T). Right-click on an empty part of the stage and select Document, then change the stage color too, if you like.

We’re going to have to make each bubble/text combination into a single movie clip so that we can manipulate them with code later on. To do this, grab your Selection Tool (V), and drag to select a single bubble/text combo. Hit F8 to convert them to a symbol, give it a name to make it easier to find later, and hit enter. No need to worry abut the ActionScript Linkages and the other options below; we’re not going to be adding things to the stage programmatically, so they can be left blank. Convert each bubble/text combination into movie clip symbols this way.

Now that we’re set up, let’s make a nice glow effect when the learner mouses over a selection. This serves the dual purpose of looking awesome, and telling the user that the movie clip is clickable. Hit F9 to pull up the Actions window; we’re going to get coding. Coding should usually be done in an external ActionScript file, but we’re just going to toss everything in frame 1 of the timeline to make things simple. I know, I know; things are starting to get hacky. We’ll clean up our act from now on, I promise.

We’re going to need to import some event listeners so that we’ll know when the learner has moused over an element, and later on, we’ll need to know when a bubble (and which) has been clicked. We’ll also need a filter for our sweet glow effect. In the action window, type:

import flash.events.*;
import flash.filters.GlowFilter;


Now we’ll add event listeners to each movie clip (ie, each bubble). Since they’re going to be the only elements on the stage, a quick way to do this is to add event listeners to all the children on the stage. We’re also going to create a variable within each object that stores its original look and size, before we start to apply glow filters and enlarge it a little bit. This will make it simple to restore its original state once the learner’s cursor leaves the bubble.

That can be done like so:

     for (var i = 0; i < numChildren; i++) {
          var child = getChildAt(i);

child.addEventListener(MouseEvent.MOUSE_OVER, mouseOver);
          child.addEventListener(MouseEvent.MOUSE_OUT, mouseOut);
          child.origFilters = child.filters;
           child.origWidth = child.width;
           child.origHeight = child.height;
}

Here we’ve called the functions ‘mouseOver’ and ‘mouseOut’ when the mouse begins and finishes hovering over one of the bubbles. Let’s create those functions now. In ‘mouseOver’ we’re going to apply a glow to the bubble being hovered over and increase its size slightly, and in ‘mouseOut’ we’re going to restore its initial state:

function mouseOver(event:MouseEvent) {
     var target = event.currentTarget;

     target.filters = [glow];
     target.width += 2;
     target.height += 2;
}
function mouseOut(event:MouseEvent) {
     var target = event.currentTarget;

     target.filters = target.origFilters;
     target.width = target.origWidth;
     target.height = target.origHeight;
}

There’s one last thing to do, and that is to create the glow filter we’ve referenced in ‘mouseOver.’ Instead of putting that within the function, which would create a new glow filter each time the function is called, we’ll just create the filter once, and use it repeatedly. Add this just after the import statements:

var glow:GlowFilter = new GlowFilter();
glow.blurX = 50;
glow.blurY = 50;
glow.color = 0xFFFFFF;


Hit ctrl+Enter to test your interaction. You should see the bubbles glow and increase in size when you mouse over them. This in itself can be a simple way to add visual interest to your eLearning course. In the next tutorial, we’ll look at adding click events and making the bubbles move and change size. This will allow us to display eLearning content within the bubble.

To learn more eLearning tips and tricks, visit our website at www.pathwaysinc.ca.


Make a ‘Prezi’ Style Graphic for your eLearning Course, Part I

Programming tips: Modifying Storyline eLearning modules’ variables from Adobe Flash

As part of our series of tutorials, regarding extended functionality in Storyline by using Javascript and/or assets created in external tools, I want to jump in to a more advanced topic that will ultimately take our eLearning modules to the next level.

Let’s say you created in Adobe Flash a very fancy navigation bar with play, next slide and previous slide buttons, with some beautiful animations and states for the buttons that could hardly be done directly in Storyline, and now you are wondering how you will be able to actually control the module with that externally developed asset.

One option, and probably the simplest, is to import the flash object into your Storyline project and then cover the clickable areas with hotspots. While effective, because they will easily trigger the actions you want, this hotspots will also interfere with the states of your buttons, like the hover and clicked states. This happens because your hotspots are basically covering your Flash object and, in consequence, this object is not receiving any mouse inputs.

Another option is to have variables in Storyline that, modified by the Flash object, will drive the eLearning module, pausing and resuming the timeline, and going to the next or previous slide. In this tutorial, I want to show you how to achieve this by only using 2 variables in Storyline, that way we can also explore a bit more about triggers on the slides.

Just a heads up, since we will be using ActionScript 3 in Flash, we will have to do a bit more with coding compared to the first 2 tutorials.

Setting up the environment in Storyline

Let’s start by setting up the environment within Storyline, that way when we jump to coding in Flash, we will already know what to modify in our eLearning module.

The first step is to create 2 variables in Storyline that, as I mentioned before, will affect our module, pausing it or resuming it, and making it navigate to different slides. This variables could be as follows:

  • pauseModule: This variable is a Boolean or True/False and its default value is set to False.
  • navigateTo: This variable is Text variable and it’s default value is set to blank.

The second step is to create the triggers on the slide that will actually affect it. This triggers could be as follows:

  1. The first trigger should pause the timeline when ‘pauseModule’ changes to True.
  2. The second trigger should resume the timeline when ‘pauseModule’ changes to False.
  3. The third trigger should make the module jump to the next slide if ‘navigateTo’ changes to the value “next”.
  4. The fourth trigger should make the module jump to the previous slide if ‘navigateTo’ changes to the value “prev”.
  5. The fifth trigger should reset the value of ‘navigateTo’ to blank when the timeline of the slide starts.

Note: On the third and fourth triggers, the comparison to the values “next” and “prev” shouldn’t be case sensitive, that way we can ensure that inputs like “Next” or “PREV” have the same effect on the module.

Extending a bit further our work in Storyline, we can easily create a Master slide and implement this triggers in there, that way we don’t have to repeat this process n-times throughout our module.

Controlling our eLearning module with AS3

Now that we have set our variables and triggers in Storyline, it is time to go to Flash and create the code that will activate those triggers.

Let’s assume we have created 3 buttons and they are as follows:

  • A play/pause button called ‘playPauseBtn’
  • A next button called ‘nextBtn’
  • A previous button called ‘prevBtn’

With that in mind, let’s create our code in AS3. In this part, I will explain each line of code so that we all have a clear understanding of what they do.

The first step is to import the libraries related to the events of the mouse (e.g. Click event) and related to the communication of our Flash object with Storyline.

import flash.events.MouseEvent;

import flash.external.ExternalInterface;

The ExternalInterface library will allow us to call Javascript functions that are external to our Flash object, and the MouseEvent library, will capture the mouse input on our buttons.

var playPause:Boolean = false;

var navigateTo:String = “”;

In the lines of code above we are defining the same two variables we defined in Storyline, the ‘playPause’ variable relates to the ‘pauseModule’ variable and will indicate whether to play or pause the timeline of our eLearning module; the ‘navigateTo’ variable will determine if the module has to navigate to the next or previous slide from the current slide. These variables will be modified by the functions linked to the following event listeners:

playPauseBtn.addEventListener(MouseEvent.CLICK, controlTimeline);

nextBtn.addEventListener(MouseEvent.CLICK, navigateNext);

prevBtn.addEventListener(MouseEvent.CLICK, navigatePrev);

In essence, an event listener, is a function that will be executed when an event happens, in this case, the controlTimeline function will be executed when the playPauseBtn is clicked, and the navigateNext and navigatePrev functions will be executed when the next or previous buttons are clicked, respectively.

Now let’s see how these 3 functions are defined, starting with the controlTimeline function:


function controlTimeline(evt:MouseEvent):void{

                playPause = !playPause;

                ExternalInterface.call(“GetPlayer.SetVar”, “pauseModule”, playPause);

}

We will take a more in-depth look at the structure of AS3 in a future tutorial, in the meantime, let’s understand what the previous function is doing.

Basically, what the contolTimeline function does is to toggle the value of the variable playPause between True and False, as explained on a previous tutorial (link to the first programming tips article), and then it executes our beloved Javascript function “SetVar” (please refer to the first programming tips article for a better understanding of this function) by passing the two necessary parameters.


function navigateNext(evt:MouseEvent):void{

                navigateTo = “next”;

                ExternalInterface.call(“GetPlayer.SetVar”, “navigateTo”, navigateTo);

}


function navigatePrev(evt:MouseEvent):void{

                navigateTo = “prev”;

                ExternalInterface.call(“GetPlayer.SetVar”, “navigateTo”, navigateTo);

}

And finally, the previous functions will indicate the eLearning module to navigate forward or backwards by changing the value of the variable ‘navigateTo’ to “next” or “prev”.

Before finishing the tutorial, let’s remember that this interaction can’t be tested locally within storyline and, as indicated on the first programming tips tutorial, we would need to make use of other tools to verify if our customized code is working.

If you want to know more about Javascript and ActionsScript 3 applied to eLearning or about how to use other tools, such as software for 2D or 3D animation to enrich the outcome of your products, don’t forget to visit our blog or our website at www.pathwaystrainingandelearning.ca.

Programming tips: Modifying Storyline eLearning modules’ variables from Adobe Flash

eLearning Gamification – Making use of tiling textures

When creating games for eLearning, you will often need to create game environments, creating wide expansive spaces.  To save on resources often game artists use tiling textures.  Theses textures are designed to align seamlessly when laid adjacently.  See the example below

brick texture

Sample texture

tiling texture                 Texture tiled horizontally and vertically


These tiling textures can be applied over a large space, whether it be floors, walls, or other complex models.

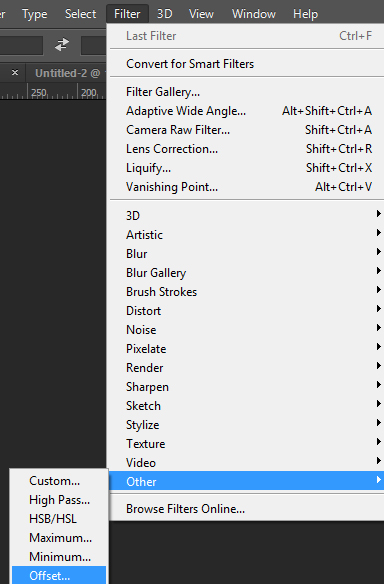
These tiling texture can be made using Photoshop.  Adobe Photoshop has a robust toolset for image manipulation and art creation. But to create tiling textures there is one tool in particular is especially useful.

From the main menu navigate to Filter>Other>Offset..filter texture

Here you can test the tile-ability of your image, to ensure it will align when the UVs are tiled on the 3D mesh.

offset1offset2

Using this method you can ensure you have hi fidelity textures, over a large environment, greatly increasing the quality in your gamification and eLearning pursuits.

If you would like to learn more about eLearning, and gamification please visit:

www.pathwaysinc.ca


eLearning Gamification – Making use of tiling textures

Programming tips: Accessing LMS functions using the Javascript API in Storyline for eLearning modules

Continuing with the programming tips we started in the previous post, regarding how to write code in Storyline for eLearning modules, let’s continue this time with a little bit more of an advanced coding.

To summarize, we now know that our eLearning modules, when published from Storyline, come with a set of Javascript libraries that allows assets developed in external tools (e.g. Adobe Flash) to communicate with our modules and modify variables.

We also know about the reporting capabilities Storyline has, meaning that all the quiz questions you create in the modules, have the option to be graded and then reported to the LMS.

However, learning may not be as simple as creating slide questions with multiple answer questions, drag and drops or matching sequences, and sometimes we are required to develop this interactions somewhere else, so what happens when you want those interactions to be part of your eLearning module’s grade?

Well, thankfully we are able to manually report that score to our LMS, using Storyline’s Javascript functionality.

Storing the activities’ points and converting it to a percentage

Let’s say we have developed 6 interactivities in Adobe Flash and all of them send a point value to Storyline after they have been completed by the learner (This will be covered in another tutorial). To store this value in Storyline, let’s create 6 Number variables as follows:

  • Activity1
  • Activity2
  • Activity3
  • Activity4
  • Activity5
  • Activity6

And set all of them to a default value of 0.

Now, after all the slides with the activities, let’s create another slide that will work as our results slide, calculating the percentage achieved by the learner on the previous activities. On this slide, we can use a Javascript code that looks something similar to this:

var player = GetPlayer();

var act1 = player.GetVar(“Activity1”);

var act2 = player.GetVar(“Activity2”);

var act3 = player.GetVar(“Activity3”);

var act4 = player.GetVar(“Activity4”);

var act5 = player.GetVar(“Activity5”);

var act6 = player.GetVar(“Activity6”);

var scoreTotal = act1 + act2 + act3 + act4 + act5 + act6;

var percentage = scoreTotal * 100 /60;


Looks a little bit complicated? Well, let me explain it.

On the first 7 lines of code, we first get the Javascript API from the player and then get and store all the six variables containing the values reported by the activities. Then we have the following line of code:

var scoreTotal = act1 + act2 + act3 + act4 + act5 + act6;

In this line, we are only finding the total achieved by the learner after going through all the 6 interactions. Finally, we see this:

var percentage = scoreTotal * 100 /60;

This is just a simple ratio that allows us to translate the achieved points by the learner into a percentage. Let’s assume we have only 6 of these interactions and each one of them awards the learner 10 points if completed correctly, thus the value of 60.

If we do the math, let’s say the learner scored a total of 40 points, then percentage will be 66.7% (rounding up to the nearest decimal).

Reporting the score to the LMS

Now that we have the percentage we want to report, we can now report it to our LMS. Thankfully, Storyline allows us to communicate manually by providing a set of functions that we can use to report score or completion.

We achieve that by adding the following lines of code after calculating the percentage:

var lmsAPI = parent;

lmsAPI.SetScore(percentage, 100, 0);

What the previous 2 lines of code do, is that first, we get the LMS API provided by Storyline, and then we use the “SetScore” function to report the percentage to our LMS. If you notice, this function takes 3 parameters:

  • The first value is the percentage achieved by the learner
  • The second value is the maximum score that can be reported, 100 in this case, because we are talking about percentages
  • And the third value is the minimum score that can be reported, 0 in this case.

After adding this Javascript code to your project, you can now rest assured that your elearning module will report a score, even if those values don’t come directly from Storyline, but they come from activities or interactions you developed in an external tool.

If you want to know more about Javascript applied to eLearning or about how to use other tools, such as software for 2D or 3D animation to enrich the outcome of your products, don’t forget to visit our blog or our website at www.pathwaystrainingandelearning.ca.

Programming tips: Accessing LMS functions using the Javascript API in Storyline for eLearning modules

Whiteboard Animation Tip

Nifty VideoScribe Trick

Typically we develop all of our Whiteboard Animations using Sparkol’s VideoScribe, and Adobe Illustrator. Assets are built using illustrator, are exported and then imported into VideoScribe.  Inside of Videoscribe settings are set such as: animation speed, entrance type and direction, pause and hold times, as well as transitions.  The final step is applying everything to the desired audio, which can be either background music, or specific voice over, to better explain the subject matter.

Overall these two tools make the processes quite enjoyable with very few hiccups in the pipeline.  However I would like to share a specific setting that could make everyone’s use of the software a little easier.

Intermittently when importing .svg files into VideoScribe I would get graphical errors on the vectors. The errors would be at random and I was unable to pinpoint which factors are causing the glitch.  After all there are a while slew of factors that make up an image/filetype that could be potential factors.

imageBut I found a solution that so far, is working consistently (knock on wood).  From Illustrator export your .svg and wait for the SVG Options dialogue box to appear.  Ensure that Embed is selected under Options and that Presentation Attributes is selected under CSS Properties.

See the image left, for a visual guide.

The setting indicated seem to perfectly correct the errors I was experiencing previously.


Take a look at a before and after from VideoScribe located below.


videoscribe

On left you can see the error that was occurring with my vector image.  It is worth noting that the error did not correct itself when previewed or published, and strangely the line size was also altered.  Regardless the solution posted has stopped this error for me. Hopefully it helps your workflow as well.

If you would like to see whiteboards animations that Pathways has created or to  learn about whiteboard animations check out www.pathwaysinc.ca


Whiteboard Animation Tip