Building Trust in a New Relationship with Your Training Vendor

Credit to Mark Snook for this post.

Last week I was walking around our office’s downtown neighborhood looking for a new option for lunch, when I was suddenly struck with a very distinctive aroma emanating from an open door just ahead. I immediately made a bee-line for the open door as there was no mistaking what delicious scent I had encountered…. food being cooked in a deep fryer.

As soon as I entered I noticed at least 30 – 40 menu options colorfully displayed in chalk behind the counter. Not having my glasses handy I asked the person behind the counter if they had Montreal smoke meat on their menu…this was returned wit a quizzical, bemused stare as the shopkeeper replied

“We only sell Poutine”

Following a few moments of stunned silence, I asked what then all the options were that were listed on the menu displayed so proudly behind him.   His reply was a very firm….

“Those are all the different kinds of Poutine we make…the best you have ever had. Trust Me!”

And there it was. Two little words that we hear constantly in our everyday lives, be that personal, business or otherwise…” Trust Me”.

In the context of the vendor-customer relationship, trust is often established over time through a collaborative working partnership that has seen project after project brought to a successful conclusion, so based on past history, when the vendor says “trust me” the customer is more likely to do just that. There is also “trust by association” where a customer enters an agreement with a vendor in part, due to the recommendation from someone (company, associate, etc.…) whose opinion they value. So again when the vendor needs the trust of their customer usually it is given. But what do we do when there has not been any type of relationship established or recommendation made? Can we really trust at first sight?

There is no denying that for some organisations the decision for determining which vendor best suits their needs is made much easier by looking at factors such as reputation for delivering quality work on budget and on time and the ability to demonstrate their expertise on demand…and thus, for them anyway, the trust portion of the relationship has been satisfied. But for many organisations they need more, they need to be able to trust the people making the promise. Here a critical point has been reached…the stage in the relationship where two parties begin to get to know each other as a means of establishing trust, and it is here where some vendors fall short for one simple reason…the person(s) they have made responsible for managing the customer relationship is not qualified for the job. That may mean they have poor organisations skills, below average communication skills or over – promise and under-deliver just to name a few. Regardless, the point is that for vendors, when choosing a person to represent your organisation, chose wisely as it does not always take much to sour a relationship to the extent the customer opts to take their business elsewhere.


So how can an individual convey a feeling of trust to those they are getting to know? Well I have been involved in managing relationships long enough to understand there is no simple answer to that question. Having said that, in talking to many project managers who deal with vendors (and speaking from my own experience) one of the first things they look for is   ”does the person have a passion for what they do” ?   People who love their job tend to be more realistic and honest about what they are capable of delivering, so starting a relationship with a person who brings passion and honesty is a great way to build trust.

It goes without saying that different people will look for different things, put more value in certain character traits than perhaps someone else would or simply some will just go by that ol’ standby, a gut feeling when deciding if the person across the table can be trusted. Regardless of what characteristics may be considered more telling than others, I think is safe to suggest that whom is chosen to sit at that table across from the customer can make a big difference, good or bad, in the relationship.

In considering the above and as a final thought, we are left with the question “If trust is not established does that mean in all instances that a successful working relationship cannot ensue?” I am not sure I have the definitive answer to that, however in thinking about that question I am reminded of a line from the movie “The Godfather II”, when Michael Corleone questions the distrust Frank Pentangeli has for Hyman Roth. To this Pentangeli replied in referring to the relationship Roth had with Michael’s father, Vito Corleone….

“Your father did business with Hyman Roth, he respected Hyman Roth… but he never trusted Hyman Roth!”.  

Spoiler alert, things do not end well for Hyman Roth so perhaps one could suggest that if he and the Godfather had a better trusting relationship, he would not have been gunned down in an airport.

Oh…as for the poutine and whether it was the “best I ever had” It was very tasty I will grant you that…but I think I will go back a few times before making any decisions. Trust Me.

Building Trust in a New Relationship with Your Training Vendor

Make a ‘Prezi’ Style Graphic for your eLearning Course, Part 3


This is our third entry on making a ‘Prezi’ style interactive graphic for your eLearning course. In the previous two tutorials, we learned how to add event listeners to your bubbles, and how to make them animate when clicked. The clicked bubble, as you’ll remember, grows in size to accommodate the display of your eLearning content. Today we’ll look at how to restore everything to its original state when your learner clicks a second time on the expanded bubble, as well as how to grey it out a little so the learner can tell which eLearning content she has already viewed.

It’s relatively simple to restore the original state of all the elements, as we saved information on this state when we first loaded the graphic. All we need to do is to call a function and assign each variable to the state we saved. But since we already have an event listener listening for clicks and calling our firstClick() function, we’ll have to switch it up, so that we can call a different function on the second click. Put the following bolded code into your firstClick() function; this will remove the current event listener, and add a new one which will redirect the click event to a new function we’ll soon create:

function firstClick(event:MouseEvent) {
                var target = event.currentTarget;
                currentGlobalTarget = target;
                setChildIndex(getChildByName(target.name), numChildren-1);
                target.removeEventListener(MouseEvent.CLICK, firstClick);
                target.addEventListener(MouseEvent.CLICK, secondClick);
//…more code
}

Now we’re set up to create the second function, in which we’ll restore all the original states to each object in the eLearning graphic. We’ll begin by switching the event listener again, so that the next click will lead to the firstClick() function. We’ll then add a color transform so that the background color of the clicked bubble will have a grey tint, to alert the learner that they’ve already visited this eLearning content. We’ll then loop through each element in turn, and use the TweenLite library to animate each back to its original size and position. Now after a second click, the eLearning graphic should look as it did when loaded originally, with the exception of a greyed out bubble where the user has clicked to enlarge. Each bubble will grey itself out this way, as your user explores the eLearning content inside each.

function secondClick(event:MouseEvent) {
     var target = event.currentTarget;
     target.removeEventListener(MouseEvent.CLICK, secondClick);
     target.addEventListener(MouseEvent.CLICK, firstClick);
     target.transform.colorTransform = new ColorTransform(.2, .2, .2);


     for (var i:int = 0; i < numChildren; i++) {
           var thisChild = getChildAt(i);
TweenLite.to(thisChild, 1.5, {width:thisChild.originalW, height:thisChild.originalH, x:thisChild.originalX, y:thisChild.originalY, ease:Strong.easeInOut});
     }
}

Great! That’s enough for today; in our next and final discussion, we’ll look at how to actually change the eLearning content inside the bubbles! This will transform the eLearning graphic from merely a neat visualization, to an information-packed, yet accessible and unintimidating eLearning element. You’ll find endless occasions to modify and re-use this basic idea. The learners of your eLearning course will definitely appreciate the effort you’ve put in to making the content not only visually pleasing, but also logically organized and manageably displayed.

Make a ‘Prezi’ Style Graphic for your eLearning Course, Part 3

Moving on Up! A New Home for Pathways Training and eLearning

Pathways Training and eLearning is thrilled to announce that we have a new home!  Over the past few years, as many of you know, Pathways has been rapidly growing and we have had the pleasure of welcoming many new and fabulous instructional designers, programmers and graphic designers to our team.

So… we began to run out of space and that meant saying ‘good-bye’ to our old office at Imperial St. and ‘hello’, to our new home right on the corner of bustling Yonge and Eglinton.  If you are ever in the area, stop by for a coffee, we’re always more than happy to chat learning and development… and show off our very cool eLearning and mLearning demo’s.

Our new address is:

2200 Yonge St. Suite 1004

Toronto, ON

M4S 2C6

Please feel free to drop by at any time, as we would love to show you our new home!

DSC_0233 DSC_0230 DSC_0226 DSC_0222 DSC_0212

Moving on Up! A New Home for Pathways Training and eLearning

A Reflective Look at 2015! Great eLearning/Mobile Learning Projects and a Fantastic Team and Wonderful Clients

As people start to wind-down for the holiday season, I have found myself reflecting on this past year.  2015 has been a wild-ride for Pathways Training and eLearning.  We continued our rapid growth while working on many fantastic and innovative projects. We were also lucky enough to hire many fabulous new instructional designers, programmers and graphic designers to our team!

As I think about all the things my team and I worked on this year, some memorable projects and accomplishments come to mind. Here is just a small sampling:

  • We completed 32 eLearning modules that were 100% compliant, within extremely tight timelines.
  • Developed over 40 amazing training videos. Many of which had SCORM wrappers with quizzes so that learning from videos could be tracked on an LMS.
  • Created a virtual simulation to help one of our Canadian financial institution partners replicate their internal computer systems.
  • Won a prestigious and coveted award for Training Excellence in 2015 from the Institute for Performance and Learning.
  • We were one of the first vendors ever to launch true video game based learning – otherwise known as gamification.
  • These mobile learning applications were attached to our financial institution partner’s LMS and were launched to employees across Canada.
  • Won several large, multi-year RFPs for eLearning modules, portal development, training videos and change management.
  • Developed 22 eLearning modules for a financial institution client in English and French in a 4-month period.
  • Continued to provide classroom based training to several of our loyal luxury automotive clients in: leadership, customer service, project management and communication.

In total, we developed over 300 innovative learning technology, animation and graphic design projects this year, while delivering over 200 classroom-based learning sessions. We even outgrew our office space, moving to bustling Yonge and Eglinton. Wow!

None of this could have been accomplished without the support of some amazing colleagues and fantastic clients.

To my team – The amount of incredible mobile learning games and eLearning courses that we developed in 2015 has been astonishing. Year over year, you all continue to amaze me, with skills and capabilities far surpassing anything I could have envisioned. I can’t wait to see what we achieve in 2016, because I continue to believe we are setting the new benchmark for innovative learning in Canada!

To our clients –Thank you for trusting Pathways as your consulting partner and for allowing us to collaborate with each of you on so many amazing learning projects. You are the reason we get to do what we love so much!

I wish everyone a very Merry Christmas, a wonderful Holiday Season and a healthy, happy and safe 2016!
20151119_205201IMG_1627

DSC_0212

A Reflective Look at 2015! Great eLearning/Mobile Learning Projects and a Fantastic Team and Wonderful Clients

Utilizing States in eLearning Modules

A good eLearning module will at least have a few interactive segments, or activities. To me these interactive elements are the bread and butter of an eLearning experience. As without any interactions an eLearning module essentially amounts to a beautifully designed PowerPoint presentation. As far as the breadth of interactive elements, there seems to be no real limitation to the activities that can be programed into eLearning modules. The only limiters are the instructional designers’s creativity, and the programmer’s technical know-how.

Given the importance of interactive elements, I feel as though all interactive elements, should always have various states of behaviour.  These states provide a sense of tactile feedback to the end user.

Since the best visual assets are those that are original custom assets created by graphic artists, it is important to ensure that custom interactive assets also have custom states created.

states

Looking at the example above you can see the visual clarity demonstrated by these 5 basic states on this simple button asset.

If you would like to learn more about eLearning, please visit:

www.pathwaysinc.ca


Utilizing States in eLearning Modules

Make a ‘Prezi’ Style Graphic for your eLearning Course, Part I

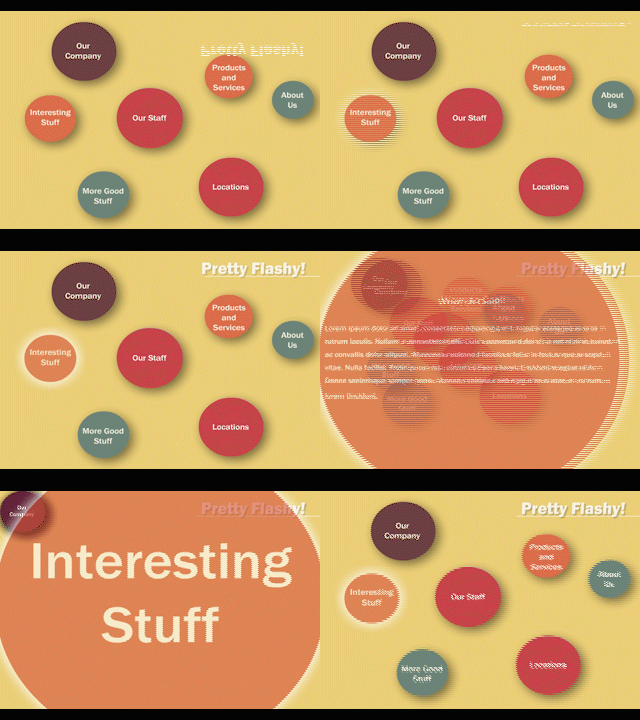
In this blog, I’d like to begin walking you through creating an interactive ‘Prezi’ style graphic in Flash Professional. This style of graphic can really spice up your eLearning content, and can be a great way to get a large quantity of text information to your learner in an engaging and interactive manner. It’s a bit of work to get set up, but once you’ve done it once, you can re-use the template in any eLearning course, and with minimal effort tweak and modify it to get all sorts of different looks and effects. Here’s a quick peek at what we’re going to be working towards.

dec_1_prezi_demo_1

As you can see, there are a three distinct elements to this interaction:

  1. The mouse-over effect: When learner passes the cursor over an item, it glows and increases slightly in size, creating a 3d look
  2. The motion effects: when the learner clicks on a bubble, it expands to fill the screen, while the others stack together in the corner
  3. The text change: as the bubble expands, the title is replaced by some eLearning content. When the user clicks the bubble again, it returns to its initial size and location, and the title again replaces the eLearning content.

There are a few ways to do something like this, but most of them are unbearably hacky and take like ten thousand keyframes, timeline labels and goToAndPlay() commands. My head is spinning just thinking about it. But we do not do hacky here, friends; there is a better path, and we shall follow it. That path involves a little bit of code, but nothing too crazy. And in the end, we’ll be left with an awesome eLearning graphic that has only one (yes one!) frame on the main timeline. Let’s get started.

Get a new ActionScript 3.0 document set up, and make some bubbles with the Oval Tool (O is the shortcut). Make them fun colours, maybe add some drop shadows. Then create some text centered in each bubble using the Text Tool (T). Right-click on an empty part of the stage and select Document, then change the stage color too, if you like.

We’re going to have to make each bubble/text combination into a single movie clip so that we can manipulate them with code later on. To do this, grab your Selection Tool (V), and drag to select a single bubble/text combo. Hit F8 to convert them to a symbol, give it a name to make it easier to find later, and hit enter. No need to worry abut the ActionScript Linkages and the other options below; we’re not going to be adding things to the stage programmatically, so they can be left blank. Convert each bubble/text combination into movie clip symbols this way.

Now that we’re set up, let’s make a nice glow effect when the learner mouses over a selection. This serves the dual purpose of looking awesome, and telling the user that the movie clip is clickable. Hit F9 to pull up the Actions window; we’re going to get coding. Coding should usually be done in an external ActionScript file, but we’re just going to toss everything in frame 1 of the timeline to make things simple. I know, I know; things are starting to get hacky. We’ll clean up our act from now on, I promise.

We’re going to need to import some event listeners so that we’ll know when the learner has moused over an element, and later on, we’ll need to know when a bubble (and which) has been clicked. We’ll also need a filter for our sweet glow effect. In the action window, type:

import flash.events.*;
import flash.filters.GlowFilter;


Now we’ll add event listeners to each movie clip (ie, each bubble). Since they’re going to be the only elements on the stage, a quick way to do this is to add event listeners to all the children on the stage. We’re also going to create a variable within each object that stores its original look and size, before we start to apply glow filters and enlarge it a little bit. This will make it simple to restore its original state once the learner’s cursor leaves the bubble.

That can be done like so:

     for (var i = 0; i < numChildren; i++) {
          var child = getChildAt(i);

child.addEventListener(MouseEvent.MOUSE_OVER, mouseOver);
          child.addEventListener(MouseEvent.MOUSE_OUT, mouseOut);
          child.origFilters = child.filters;
           child.origWidth = child.width;
           child.origHeight = child.height;
}

Here we’ve called the functions ‘mouseOver’ and ‘mouseOut’ when the mouse begins and finishes hovering over one of the bubbles. Let’s create those functions now. In ‘mouseOver’ we’re going to apply a glow to the bubble being hovered over and increase its size slightly, and in ‘mouseOut’ we’re going to restore its initial state:

function mouseOver(event:MouseEvent) {
     var target = event.currentTarget;

     target.filters = [glow];
     target.width += 2;
     target.height += 2;
}
function mouseOut(event:MouseEvent) {
     var target = event.currentTarget;

     target.filters = target.origFilters;
     target.width = target.origWidth;
     target.height = target.origHeight;
}

There’s one last thing to do, and that is to create the glow filter we’ve referenced in ‘mouseOver.’ Instead of putting that within the function, which would create a new glow filter each time the function is called, we’ll just create the filter once, and use it repeatedly. Add this just after the import statements:

var glow:GlowFilter = new GlowFilter();
glow.blurX = 50;
glow.blurY = 50;
glow.color = 0xFFFFFF;


Hit ctrl+Enter to test your interaction. You should see the bubbles glow and increase in size when you mouse over them. This in itself can be a simple way to add visual interest to your eLearning course. In the next tutorial, we’ll look at adding click events and making the bubbles move and change size. This will allow us to display eLearning content within the bubble.

To learn more eLearning tips and tricks, visit our website at www.pathwaysinc.ca.


Make a ‘Prezi’ Style Graphic for your eLearning Course, Part I

Make a ‘Prezi’ Style Graphic for your eLearning Course, Part 2

Today we’ll continue exploring how to create an interactive ‘Prezi’ style activity for your eLearning course. Last week we learned how to create a mouse-over effect on the bubbles in order to give your learners a visual hint that the bubbles are clickable on an eLearning slide. Today, we’re going to explore how to make all the on-screen elements animate when the learner clicks on a bubble. We’re going to make the clicked bubble increase in size, and decrease in; this gives you an appealing background on which to put text and other eLearning content. The non-clicked bubbles will all stack themselves on the corner of the screen so as not to distract your learner.

dec_1_prezi_demo_1

Once we’ve finished this project, it’s a simple feat to change the animations and interactions as you desire. For example, you could make an eLearning quiz game where the bubbles float upwards, and the learner selects the correct answer by ‘popping’ the bubble which contains it. Or an interaction where the bubbles animate towards the mouse cursor, giving it a magnetic effect. There are endless variations with which to add interactivity and visual interest to your eLearning course.

Let get started!

The first thing we’re going to want to do is to save some information from each bubble. We’ll create variables within each bubble movie clip to store information on its initial position, size and opacity. We’ll add an event listener which will call a function (named ‘firstClick’) when your learner clicks a bubble. In the actions panel, add the bolded code:

for(var i:int = 0; i < numChildren; i++) {

     var child = getChildAt(i);

     child.addEventListener(MouseEvent.CLICK, firstClick);

     child.addEventListener(MouseEvent.MOUSE_OVER, mouseOver);

     child.addEventListener(MouseEvent.MOUSE_OUT, mouseOut);

     child.origFilters = child.filters;

     child.origAlpha = child.alpha;

     child.originalX = child.x;

     child.originalY = child.y;

     child.originalW = child.width;

     child.originalH = child.height;

}


We’re now able to easily reset our bubbles to their original state by restoring these saved values. One last thing to do before we actually start moving things around is to add the TweenLite library to our code. This allows us to easily animate objects within the eLearning graphic. Download TweenLite from https://greensock.com/tweenlite, and unzip the TweenLite ‘com’ directory to the same folder you’ve saved your flash file. You can now use the Tweenite library to animate objects within your eLearning graphic. Add the following bolded import statements at the top of your code:

import flash.events.*;
import com.greensock.*;
import com.greensock.easing.*;
import flash.filters.GlowFilter;


Now let’s create the ‘firstClick’ function we referred to earlier. I’ve annotated the code so you can more clearly see what we’re doing at each step of the process.

function firstClick(event:MouseEvent) {
//this sets the clicked bubble as ‘target’ and lets us 
//manipulate it
var target = event.currentTarget;

//this brings the clicked bubble to the topmost layer, so 
//that it animates over top of the other bubbles
     setChildIndex(getChildByName(target.name), numChildren-1);

//this enlarges the clicked bubble, and positions it in 
//the middle of the screen
     TweenLite.to(target, 1.5, {width:500, height:500, 
         x:(stage.width)/2, y:(stage.height)/2, 
         alpha:0.5, ease:Strong.easeOut});

//this shrinks and moves to the corner all the bubbles 
//that weren’t clicked
     for (var i:int = 0; i < numChildren; i++) {
           if (getChildAt(i) != target) {
               TweenLite.to(getChildAt(i), 
                  0.75, {width:100, height:100, x:50,
                  y:50, ease:Strong.easeIn});
         }
     }
}


Your eLearning graphic should now have bubbles that highlight when you hover over them, and animate when you click on them. Next time, we’ll look at how to restore the bubbles to their original size and position, and how to ‘grey out’ the bubbles once they’ve been clicked, so that your learner can easily tell which eLearning content they’ve already visited.

For lots more tips and tricks on enhancing your eLearning course with animations and interactivity, visit our website at www.pathwaysinc.ca.

Make a ‘Prezi’ Style Graphic for your eLearning Course, Part 2

Tips on Working with Volunteers for an eLearning Video

This past week I spent most of my time directing an eLearning video that I had developed for one of our larger clients.  The “shoot” included multiple locations, a tight filming schedule and several volunteers.  To prepare for the project I spent a few hours researching training videos, reading blogs that offered filming tips and ensured my script would be easy to follow and provided the necessary direction both for the talent and film crew.  As such I felt going in to the first day I had done everything I needed to and was well prepared…but unfortunately I forgot ear muffs.  That may not sound that important but the reality is it was cold outside, some of the volunteers were standing around for a few hours and several did not wear a hat for fear of ruining their styled coif for the camera.   The result was a few complained about having very cold ears which in turn made them a bit grumpy and thus their on-screen performance was made that much more difficult as they were expected to convey a positive, happy outlook on camera.

The above scenario may sound a bit trivial, however the point is that despite all of my preparations, I was still surprised by this and in fact a few other issues that arose as a result of working with volunteers who had not been part of a video shoot before.   As such I have offered a few simple tips and advice on working with volunteers as part of your eLearning video shoot.

Arrange for more help than you need.   It is not uncommon for people that have agreed to volunteer, given you their solemn oath and vow they will be there…to all of the sudden remember their guinea pig needs to go to the vet the same morning you need them.  People will change their mind and the reality is there is precious little that can be done to combat that particular phenomena, so the best recourse is to expect a 20 to 30 percent no-show ratio and book your volunteer numbers accordingly.

If you have the resources, assign a person to manage your volunteers when using a larger group during filming, especially when on location.   Trying to keep track of 10 or more volunteers who are not used to being part of a video production is about as easy as herding cats, and a significant distraction when you are already busy filming, directing, etc… Having someone there whose job is solely to manage your volunteers and keep them out of harms way until you need them will go a long way in ensuring a successful day.

Eat, drink and be merry!    Regardless of the length of your video shoot ensure arrangements have been made for food and drink for your volunteers.    A well fed volunteer is much more likely to be a willing participant and take direction, and thus more likely to nail a scene in one or two takes as opposed to 7 or 8.


Explain everything.  A video shoot is a new experience to most people so if you have not provided specific instructions, do not be surprised if someone shows up wearing a “Frankie Says Relax” T-shirt or their best evening gown.  How to walk on camera, use inflection when speaking, avoid looking directly at the camera or playing with their hair, do not handle the mic if they are wearing one…these are just a few of the many details that should be discussed with your volunteers.  Again, this is a whole new world to some so things that seem common sense to an experienced videographer may not necessarily have occurred to your new volunteer.  By providing as much detail and instruction that is appropriate will help to avoid delays and frustrations.

Don’t worry, be happy.  Remember, when working with volunteers do your best to maintain a positive attitude.   I know from experience how frustrating a video shoot can be at times, especially when your well thought out plans have been laid to waste by technical problems, weather conditions and other elements outside your control.  Despite this however I do my best to keep in mind that I am working with people who have volunteered to help, and that I should do everything I can to make their experience a positive one…including remembering to bring ear muffs next time.

To learn more about eLearning training solutions offered by Pathways please visit our website at http://www.Pathwaysinc.ca

Tips on Working with Volunteers for an eLearning Video

Creating Accessible eLearning that is 100% Compliant with AODA (Accessibility for Ontarians with Disability Act) eLearning Standards

In order to ensure that your eLearning course is accessible to everyone, you have to keep in mind the new Accessibility for Ontarians with Disability Act (AODA) act when designing your course and activities. The AODA act as it relates to eLearning, means that all learners, regardless of disabilities should be able to complete the same course and achieve the same objectives as fully-abled learners. Assistive technologies such as screen readers can help learners to access the content, but it is also important that your course is compatible with these tools, if you want your eLearning to be accessible and fully compliant. Put yourself in the position of someone using these aids to interact when designing and testing your eLearning and to ensure all learners will have the same experience.
Here are some tips to help make your elearning better for everyone to use, when building your accessible eLearning module in Articulate Storyline.

  1. Minimize the number of tab-interactable objects on screen. Turn off the tab interactivity of unnecessary objects.
  2. Where possible, keep colour contrasts in mind with regard to the different types of colour blindness that some of your learners might have.
  3. Make alt text to describe images and instructions for selectable objects.
  4. Have closed captions for all audio.
  5. Avoid interactions that require use of the mouse (e.g.: drag and drop activities).
  6. Make sure that navigation is clear. Use ‘select’ instead of ‘click’ for objects to be clicked on. Be descriptive and provide as much detail as possible.
  7. Choose a large, easy to read font for your text. Sans serif fonts are friendlier for learners with dyslexia. Recommended typefaces are Calibri, Myriad Pro, Century Gothic, Trebuchet MS and Arial, and they are all easily available.

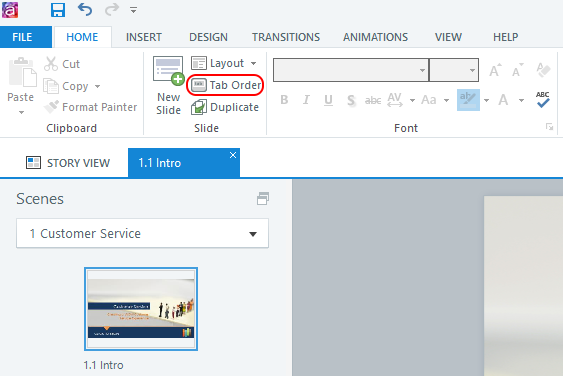
The most important tool in Articulate Storyline for accessibility is the Tab Order function. You can find it in the Home menu, the second section from the left.

AODA1.1

This will open a pane in which you can see and edit all the objects on your screen that can be tabbed to. Here, you can delete tab functionality from unnecessary objects, add alt text, and change the order in which items will be selected (aside from the player bar controls). Here is an example of a slide before and after editing tab functionality. I removed some of the background shapes, added alt text to the images, and moved all the images to the top of the tab queue.

To learn more about how to design accessible eLearning and the eLearning and technology training solutions offered by Pathways please visit our website at http://www.pathwaysinc.ca

Creating Accessible eLearning that is 100% Compliant with AODA (Accessibility for Ontarians with Disability Act) eLearning Standards

MEANINGFUL GAMIFIED ELEARNING

AN INTRODUCTION

When people are building eLearning programs, a lot of the focus is placed on having the user take something away from the experience. However, many people don’t realize that games offer a lot of takeaways as well, which aren’t exactly the same, but have become fixtures. So much so that doing anything different means the game isn’t intuitive, and the new ideas need to be explained. The challenge is really finding where these two ideas meet and offering something that hits both the eLearning and gaming ideals.

WHAT ARE THESE TAKEAWAYS?

What I mean by games having takeaways is mainly in the controls. Every type of game in our minds has that certain set of familiar keys (for example, W, A, S, D) we use that are the standard for how we interact with the material on screen. The same goes for eLearning in the sense that we’re expecting to be able to the exact same things with our controls, like Play, Stop, Next Screen, Previous Screen, and volume. Any breaks in those conventions means we need to explain how everything works. Immediately in that small detail ,is a takeaway.

In the grander scheme of things, however, we’re dealing with games that are becoming more sophisticated in their overall quality. There are deeper stories, larger worlds, and generally more immersive experiences. All things that could benefit an eLearning program that uses a simulation, which I talked briefly about in my article on virtual reality. There’s also another aspect to the issue, which is generational.

We have a group of people in eLearning who grew up in a time where games and learning were two very different worlds and they have problems combining the two ideas. To them it means you’re developing one thing or another because a lesson can’t be conveyed. Completely untrue! A game can teach you a lot without you noticing, and still make the experience enjoyable.

HOW CAN WE COMBINE THESE IDEAS?

We’re always looking for ways to keep the enjoyment of pure gaming, but also use that idea to help the user learn more detailed things in an eLearning program. The main one of which is via simulation. It offers an environment where the user can be immersed in the activity and get an idea of what to expect when the learning comes more from practice. It’s also something that already exists, because there are simulators for driving and fight simulators, therefore this idea is easy to grasp.

WRAPPING UP

If you would like to explore more about gamification, mobile learning and eLearning, take a peek at our company website: Pathways Training and eLearning, at http://www.pathwaystrainingandelearning.com/. We always look for fresh ways to engage learners and to make the learning experience as fun as possible!

MEANINGFUL GAMIFIED ELEARNING